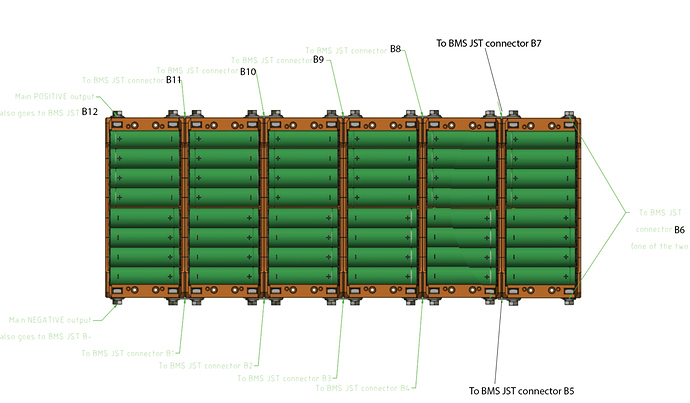
Ok, so if you would print my diagram and fold the paper in half in the middle you will have correct diagram and easier to understand  just need to add couple of modules and extend b1, b2… Count to b13 for the last positive
This seems outstanding to me.
No wonder. I’ve been spoiled. I use 30q mostly, but when I use other cells, they usually seem inferior…
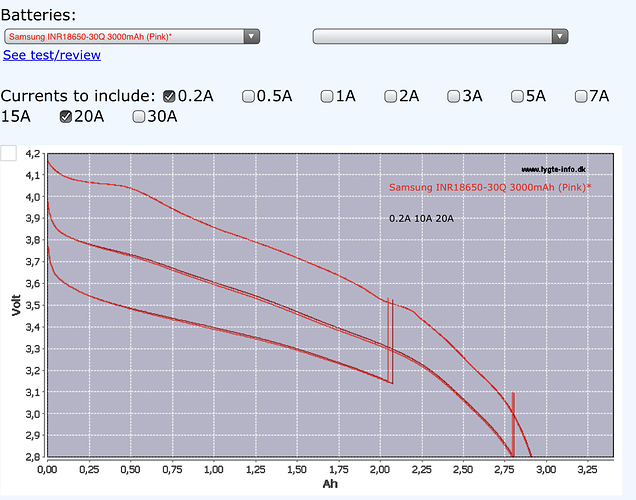
That looks pretty similar to the other graph. the 20A line stopped before the end of the discharge and your graph doesn’t go down to 2.5v
A discharge test till 2.5V isn’t really what you will ever have.
Or would you want to use your cell only for one discharge cycle and than through it in the trash.
So to take the capacity differences at 2.8V we are easy over the 5% difference.
And you are right the graphs are similar. Didn’t see that yours go down to 2.5V.
And you probably wont ride your board below for example 50% charge( or 3.2v or so idk) because the board will feel weak and slow
So go for as high capacity as you can to keep the voltage high over time
I used to cut off my lipos at 3.4v, what do you guys usually set your 18650 packs at?
I was planning to start cutoff at 3.2, end at 3.1. Is that normal?
I am not saying to discharge to 2.5v but that is the point where you can compare capacities at the same voltage. When the cell is discharging at high load, it is sagging so if the discharge is stopped, the voltage will increase; you can see that in your graph. So when looking at these graphs, don’t take the voltages as unloaded voltage values (except fully charged and discharged voltages).
I don’t think I am explaining this very well…
My point is that cells don’t loose much capacity with higher discharge rates, it just seems like it because the voltage goes lower sooner while under higher load. For example, at 10A discharge if i wanted to have my cell at 3.1v i would discharge to 2.8v while under load then it will rebound back to 3.1v once the discharge is stopped (as your graph shows)
I said 3.4 for example, not sure what the low limit for 18650 and good cycles is, anyways the higher the limit the more cycles you will get out of the battery
Ok, ive redrawn the diagram, just to be 100% if got it right … can you confirm this is ok?
also, here’s a picture of my BMS - there are 11 white leads, when the diagram you supplied would suggest that I would need 12 (since im making 12s and not 11s).
also…anyone else…what are the wires coming out of the lower left of this device…asking for a noob friend
12s battery has 12 negative terminals, black wire lands on the first one, the next white wire lands on the next one and so on, last red wire lands on main battery positive terminal. Black wire is the one that you think is missing. The wires in the lower left are temperature sensors
Thank you, I understand. 2 more questions.
-
so the negative terminals in the drawings are located in between the packs - on the metal thing that bridges/connects them…is that correct? (also is the drawing ive now ammended 100% correct?
-
…where is the ESC plug/soldered on? - or do they not run through the BMS (I can’t’ see why the ESC would need to go through the BMS)
…and i guess the temp sensors don;t need to be plugged into anything…they’re basically good to go as-is?
Looks correct to me.
Did the BMS not include a wiring diagram? Usually they can give you an idea of where the other wires go as well
nope. came in bubble wrap and nothing else. oh i got a free sticker too
Oh rip haha
This post
has a diagram in it that I found for a similar smart bms to mine, I used that to remind myself of basic layout. Keep in mind this diagram in the post is wired “for discharge” as in the battery current out to the load goes through the bms, if you want to wire “for charge only” it’s a little different, let me know if you need more detail
will def let you know if i need help, most certainly will when the parts arrive lol. Can i ask how thick your stacked 30q pack was in total (i.e. finished wth fishapaper and all the other stuff)
I’d have to measure it, but off the top of my head somewhere around 30mm. I think the cutout is like 10mm deep and then the BB double stack is like 28mm deep or something like that
Then I added neoprene on one side and thin foam on the other and overall it’s a snug fit, with the gasket around the enclosure.
Don’t worry I’ll be updating the build thread tonight… hint hint I basically finished it lol just didn’t wanna post “almost finished” pics as to not spoil it until it’s done and I take real pics of it
ah ok. my double stack NESE is goinf to be 40mm all-in…
looking forwrad to seeing the thread!
I don’t believe this is enough of a difference between the soft and full cut. I run 3.4 soft and 3.15 full. You dont want to hit the soft cutoff and then sag below the full cut on the last hill home or something.


