Update: The pyrography is done!
Siiiiiiiiiiiiiiiiiiiiiiiiiiiiiiiiiiiiiiiiiiiiiiiiiiiiiick ![]()
It’s a snake you goof.
Sssssssssssssssssssssssssick!
@Flyboy @Venom121212 cheers fellas. Doing the woodstain today, will post a progress update later. Stay tuned!
Also, I’ve decided against glass frit. Spar urethane is really expensive so even though clear grip will look a bit crap, it will be cheaper and there’s less chance of me screwing it up.
I can send you some in a ziplock baggie lol
Anything else available to you? Epoxy works even better for frit IMO.
Haha not sure how well that would work.
I suppose I could use epoxy but I was under the impression it produces a hard coating which I’d imagine is prone to cracking? Whatever the glass frit substrate is, I’d want to finish the entire deck with, because it’s currently just bare wood
You would use a laminating epoxy, same as you would for fiberglass. They do cure hard, but since they are designed for an elongation-at-break greater than glass, they can keep up with deck flex. Consider that there are carbon decks out there made with the stuff, that basically act like trampolines
My builds are deck-> epoxy → frit → epoxy → spar urethane x2 for UV resistance
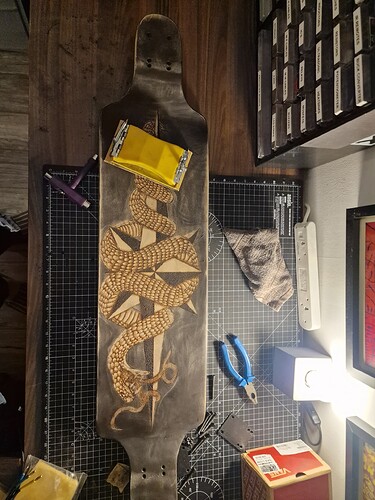
I was hoping to have a finished deck for show but life got in the way this evening. Since I promised an update, here is Nagini in all her beauty so far:
I’m super stoked with how it’s coming along. It is exactly what I had envisioned!
As you can see, I sanded down the back and re-stained it. It is much more uniform now.
I got sloppy with the surface prep on the front side though because I was too excited to see it come together, so there are some blotchy patches I’ll need to sand off and re stain. I’m hoping I can get away with just redoing small sections without there being any disparity in colour or surface finish to the bits I am not going to sand…
Some of the stain leaked into the pyrography so I’ve had to file it down in those areas and will need to reburn some sections. This shouldn’t take too long.
Holy shit that’s gorgeous. Amber on black works so good
Thank you, I’m so happy with how it’s turned out.
It’ll look better with a clearcoat too!

Looks rad man. Nice work.
Hello wankers and wankettes,
Apolgoies for my inactivity as of late. January was a mad one with exam season, I pulled a total of 4 all nighters within the first week - that was fun. And since then, I’ve been madly playing catchup at work. To add to it all, my partner and I are planning to buy a place together and it’s been a huge focus to get the flat sorted and ready to move.
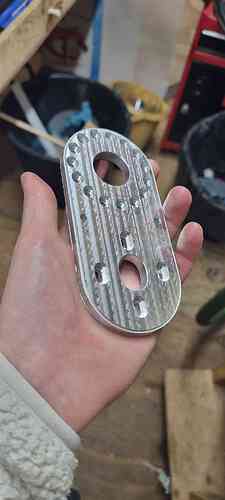
Excuses aside, I’m back to provide you with more Nagini content. I’m currently getting my custom motor mounts machined by a friend I made at a meeting up in the land of the Scots, and I’m SUPER excited to have these in my hands. Here’s a progress pic:
Not far from done with the deck also. There’s been some back and forth with sanding, staining, and re-burning to get a nice even finish. It’s not perfect but I’m happy with it. I experimented with sanding a strip around the edge of the top surface to outline the deck, but it just looked crap so I’ve fixed that. Now all I need to do is redo some pyrography I sanded away, and then coat and frit the deck.
I’ve ordered some XCR coating epoxy from easy composites. This stuff is marketed as super clear, so it should really make things pop, as well as UV resistant and having mechanical properties suitable for sports equipment, such as ski’s and snowboards. That gives me enough confidence that it will keep up with the minimal amount of flex Nagini will have.
I’m yet to order the frit - I need to figure out how much to buy. But I do know I’m planning to use clear, fine frit, without any epoxy on top. This should provide adequate grip, good coverage and still show the burned in graphic beneath.
In terms of electronics, @BigBen kindly sold me a MakerX DV6 Pro to use. The wires and connectors are on order from everyone’s favourite chinesium supplier, AliExpress. Should arrive end of March, but I’m in no rush.
The main thing left to figure out is the enclosure. I think I’ll work on that when everything else is completed.
The board is looking great dude.
I love that stain!!!
Thank you, really appreciate it!
I know I said I wouldn’t be a perfectionist on this, but where I’ve left Nagini unprotected for a few weeks and had to move the deck around, she’s acquired a few scratches that are really bugging me.
Final sand, refinish and re-burn before the epoxy I’ve been putting off for so long!
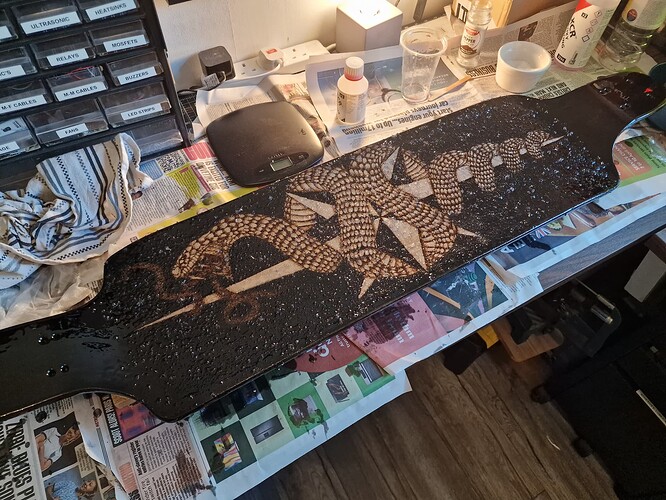
This was a nightmare. I hope it turns out okay, Imade so many mistakes with the resin. Its my first time using epoxy so I was quite nervous but I thought I had it all planned out until it came to the pour.
I mixed up 200g of resin, thinking it would be just enough to cover the top surface of the deck. I had clingfilm on my weighing scales to prevent them getting epoxied but unfortunately it was messing with the readings and I accidentally added about 5g too much resin, so I compensated with an extra 2g of hardener.
I poured all of the resin onto the board because I was worried about it getting too hot in the cup. That was my second mistake. I used way too much and it started to drip down the sides and create little icicles.
That, and the fact I had slighlty screwed up the proportions meant the resin was runnier than expected and took about 15 mins to get tacky instead of 8. Because I hadnt warmed up the deck, it started to form pits or bubbles. I tried removing them with a blowtorch but all it was doing was burning the deck, so I switched to a heat gun but that was just blowing the resin around. Instead, i kept brushing back and forth until it was tacky enough to stop the bubbles forming.
Where I had brushed the icicles away, lots of resin got onto the other side of the deck (the top surface) and I realsied it would create an uneven surface and when it came to coating that side properly it would look shit. I didn’t have the option of sanding it away either because that would ruin the pyrography and stain, so instead I quickly fashioned together a stand for the board with a piece of pallet wood and some screws. This allowed me to tip the deck over so I could quickly mix up more resin and coat the other side.
I mixed up 100g, this time without the clingiflm on the scales so it was correct, and carefully turned the deck over. By this point, more icicles were forming and had become quite tacky. As I was trying to brush them flat, brush hairs were getting stuck to the tacky coat and I had to remove them from the board.
I poured the 100g over the top surface of the deck which again, was slightly too much and was too runny and creating drips. I smoothed over the semi-cured sections that had bled onto the surface with the second batch, and spent about half an hour going back and forth with the brush, removing drips and ensuring an even coat. It’s not perfect but about as good as I think it’s going to get.
I realised that I was low on resin and didnt have enough to do a second coat as I had planned, so I wanted to put the frit on at this stage. I had 100g of fine frit and 25g medium frit. I poured the medium frit into a small bowl, and salt bae-style trickled it onto the deck. It was really uneven, so i used one of my brushes to try to redistribute it.
I then found that the 25g medium frit wasn’t going to provide enough grip so I emptied out a plastic pepper grinder from the kitchen, filled it with the fine frit and started to apply it. Unfortunately the grinder was crap at letting the frit pass through so i poured it into a small bowl and employed salt bae’s technique once again. This worked quite well, but in order to ensure an even distributuon I had to use about 25g of fine frit. I then took the brush to it to distribute. Lots of frit was coming off onto the brush, but enough remained on the deck to provide grip.
Long story short, I spent about an hour and a half panicking, and it felt like a total shit show. However it will be the end result once cured that determines if I’ve managed to pull it off or not.
I also had the genius idea mid-epoxy-frenzy to wash my brushes in the kitchen sink. I then realised what i had done and scrubbed the sink 3 times to decontaminate.
I can quite confidently say I wont be doing this again for a while ![]()
From the photo looks great man. First time is always really hard.
Thank you, I am quite pleased with it. At this rate i just want a working board more than anything else, ive let this project drag on too long
If you hadn’t written about all the panic and problems you had, I would have had no idea you ran into any issues doing the frit. Looks like it came out really good.
Looks pretty awesome to me!


