Sweet tire! Less wide takes a bit more balancing skills at low speed. But possibly more fun carving while driving.
Yea I miss carving now that I built a Trampa that’s not carve friendly at all so this will be my fun 2nd board when riding in the city. Had some fitment issues with the big boxes as they warped a bit on my friends magnetic bed. If I cant get them to fit I will print new ones on my CR10S that I bought this past weekend. Just a huge upgrade from my Anet in every way.
2 Likes
Got some motivation the last days so building again 
Forgot that I dont have a BMS so ordered one but using it for charging only and will put on a meter to show the voltage. Don’t want to risk it switching of while riding lol had that happening with the hooverboard and it ain’t fun…

Got a few DeWalt 36v 4ah packs that I will use to build a pack.
Going to aim on a 12s4p but might not fit. Its 18650 Samsung 20R cells so not the best but they are free  Will build with sanyo 20700B in the future if I want to keep this.

3 Likes
Looking sweet! You are almost there I see. I think 12S3P is the maximum you will be able to fit in the backside. For 4P you will need to put a small spacer in the battery compartment. Like they do on stretched limo’s.
This is so awesome for a project. Excuse my ignorance, I read through but may have missed it. Are you running a vesc now inside this with the hoverboard motors or still using the original esc?
Yea a 3p is what I expect to fit but goal would be 4p
Yes, I am running it on a dual Focbox VESC setup right now. I will do a much needed update on the pros and the cons tonight…
4 Likes
Would appreciate that, thank you
Why dual? For one motor? What am I missing here lol
1 Like
Its dual motors 2 separate hooverboard motors just put together in the shell.
Cant wait for the Vesc info  was tempted to do it myself I dont trust the hooverboard esc. dual cheap foc esc would be sweet!
1 Like
Ah I see now.
So here is a long due update of my current board. I have exchanged the Hoverboards BLDC for a dual FOCbox setup running the latest VESC version 5 firmware.
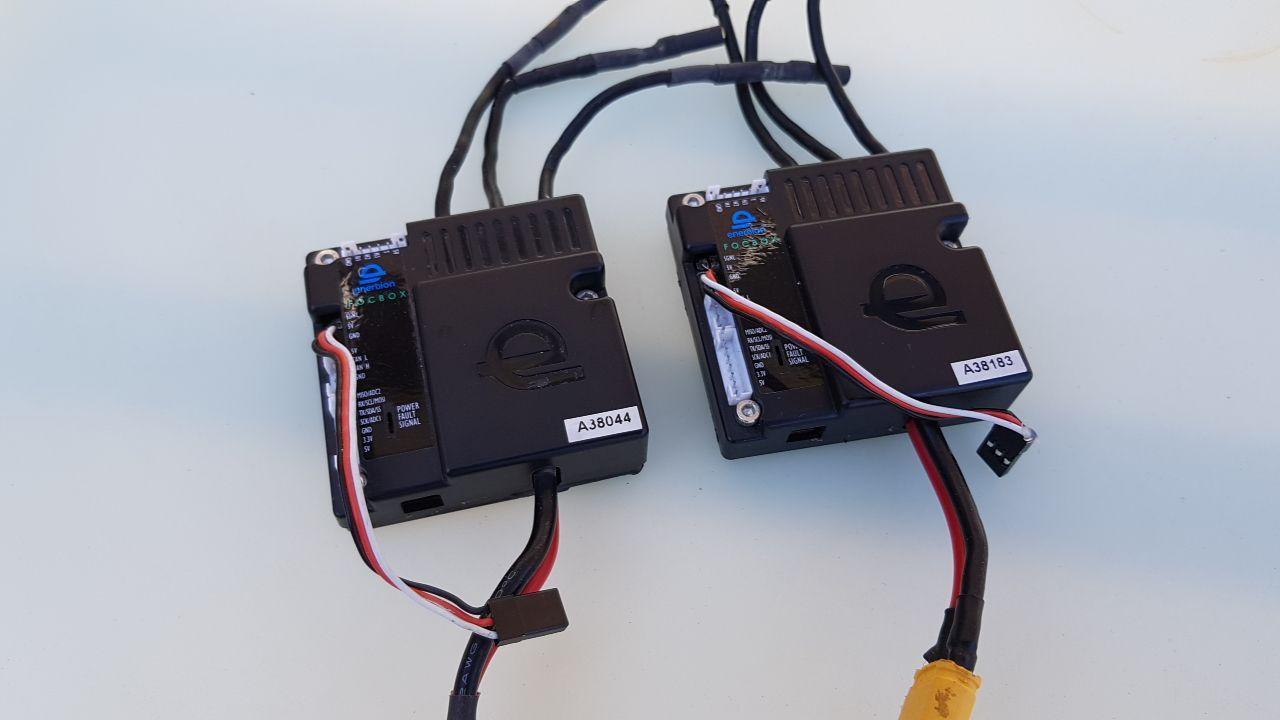
Each motor is connected by its own set of hall sensor wires and the VESC are connected to each other with a Canbus cable so it acts like a master slave setup.

The master VESC is running the balance app and has an external IMU board. In my case it is the MPU6050 which can be bought at most electronic websites for a price ranging anywhere from 2$ to 8$.
FOCbox’es are not made anymore, but they seem to have a proven track record as reliable hardware and I purchased a mildly used set on this forum.
Initially the setup was really frustrating (and I am not frustrated quick). This being my first encounter with VESC firmware and not finding much references to similar builds made me feel like pioneering in the unknown and there is an endless amount of variables to overcome. At first I spend multiple days trying to find out why the motors where cogging up only to discover it is probably a piece of code from an old firmware that was not overwritten during the firmware update. Pressing the ‘load default motor settings’ on the right side in VESC tools application followed by ‘write motor configuration’ solved this issue.
After this the VESC motor setup is actually quite straight forward. I tested the motors while disassembled but I guess this could also be done while they are inside the hub as long as only 1 of the VESC is powered* to prevent them from working against eachother.
*Don’t (dis)connect the Canbus wire during use because it can damage the chip.
After setting up the motors it is time to look at the balance app. Once activated you can go to the IMU tab and select IMU_TYPE_EXTERNAL_MPU9X50 at IMU type, it uses the same library as the MPU6050. Mitch (@NuRxG) wrote a really cool IMU calibration wizard that calculates the gyro offsets automatically for you, just hold the sensor level and press start. In the Accelerometer graph at the bottom check if the value of X and Y are near zero and the value for Z at 1. ACC Z represents earths gravity and it is the only value you don’t want at 0.


In the balance tab you have options to set PID values, low voltage behaviors, tiltback / pushback, footsensor switches and a lot of other things that will make this story an instant ;tldr. If you get to this stage there are lots of knowledgeable people on this forum that can help out with your specific questions. Hopefully future releases of the firmware will include help text buttons explaining each function in layman’s terms but for now you will have to accept that you are exploring new grounds.
The pros and cons of my upgrade.
First off, the VESC resembles a huge upgrade in performance. You get considerably more power (which aids in off-road performance) and an endless amount of customization tools that could potentially make your Onewheel perform better than the one Future Motion is selling. If you like riding your Onewheel more than just occasionally and you are aware that this is not a plug and play build I would highly recommend upgrading to VESC.
The cons of VESC? I started this Onewheel hoverboard conversion as a budget build. And purchasing a set of 2 proper VESC units almost doubled my investment in the project. Also as noted earlier, this is not plug and play so be prepared to spend time, time and more time to get this going to a level that you are satisfied with.
Hoverboards have been made by the millions, and luckily for the hobbybuilders, the hype is over and stocks are being sold off at prices that are insanely low. If you want to build a Onewheel for occasional use I would still recommend trying the original hardware. It is a ton of fun for a small investment. The original hardware works surprisingly well and seems quite reliable. Just be prepared to accept the following:
- Angle equals speed; On a Onewheel you want to lean to accelerate, but for a hoverboard the angle is the determining factor for your speed. You have to keep the nose down to maintain speed. The further you push the nose down the faster it will go. But pushing the nose far down at maximum speed does not really feel good as a nosedive is not something you want to do. To counter this I calibrated the gyro while the board was leaning backwards a bit (keep the power button pressed for 5 seconds and hold it still for another 20 seconds). This way the board will have a comfortable cruising speed while it is level.
- Speed limit; The original firmware limits the speed based on the hall sensor data. On a hoverboard it is 15km per hour. With a 11” kart tire the circumstance is *1.7 so a maximum speed of 25km per hour. Upgrading the battery from 10S to 12S might help getting the amp draw down a bit, but the speed stays exactly the same. In my experience cruising speeds up to 20km per hour feel comfortable.
So which is best depends on your expectations. If you are willing to invest the time and money you could create a monster Onewheel capable of matching or succeeding Onewheels XR performance. If you just want a fun project for an occasional drive around the neighborhood the original hardware might be best for you.
18 Likes
Thank you for that detailed write up!
1 Like
Bionic24 did the owner of the superkart team have more of those tires laying around? I Also live in the Netherlands. €80 euro+ shipping for a bit of rubber is quite much for me.
Also is it possible to control both hub motors with just one vesc like this one:
Flipsky Mini FSESC4.20 50A ESC Based Upon VESC With Aluminum Anodized Heat Sink for Rc Car
It can handle about 3kw
I am planning a 14s2p setup with 35a(peak) 18650 cells
Unfortunately I get this tire question almost weekly. Sporting events are shut down due to Covid-19 so the pool of used tires is probably gone by now. I’ll ask him for the price of new tires but not sure what the prices are.
I know someone who is running both motors on a single Vesc but I think it is a compromise in which you will not get full performance like with dual ESC. 2x Flipsky 4.12 is the most economic solution probably.
I would not advise 14S on the Flipsky by the way. 13S is already pushing it.
4 Likes
Thanks for the fast response,
I will stick to a 13s with dual flipsky.  (gotta push it haha)
It’s a shame because the motors can be pushed even more than 60v, testing one with 14s and lots of resistance pulled about 600w and did not even get slightly hot. These things are build like a tank!
But vesc at higher voltages (above 60v) get insanely expensive, because of the rarity and usage.
1 Like
Hi, could you upload the file for the pressure plate that you installed, Thanks!
Here you go https://www.thingiverse.com/thing:4140325
If you search for DIY Onewheel on Thingiverse you will find all relevant files for building your own Onewheel. 
2 Likes
thank you so much, did you use 0.4 or 0.5mm nozzle and only 4 paramiters?
i just want to meke sure to calculate how much pla do i need, how much did you use?