DIY fenders - look mom, no 3D printer

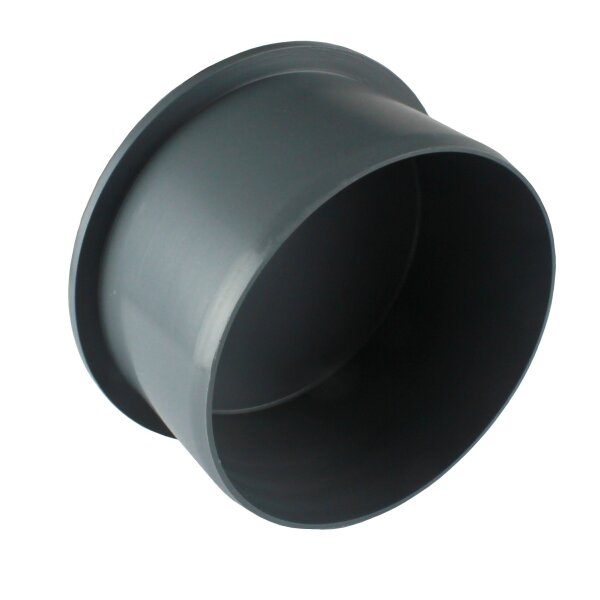
i finally got around at attempting fenders for my 107mm wheels, they are not completely finished, but i will add more pics later on and tell how they worked out.

materials used are caliber clamps, and heating pipe end pieces with 12,5mm diameter

tools required: whatever saw and a dremel :slight_smile:

the nice thing about them is that you can adjust them just like the motor mounts that fit those clamps

tell me what you think about the idea people

28 Likes

Looks good! Wonder how well they work.

me too , my biggest concern is stones getting caught up between the wheel and the fender, ruining my wheels… i have to see how it turns out

ill try to get these finished during the weekend and keep you guys updated

3 Likes

well i made some progress earlier than expected, here is what they look like now, not tested yet tho…

notice the adjustable shredlights bracket… i know its not the best solution but it will do…
and yes its the rearlights, i had them at hand

alltogether it kinda reminds me of this guy:

20 Likes

Looks good! I think you might indeed need a little more clearance between the fender and the wheel but im sure you’ll find out soon haha

1 Like

Really nifty idea! I reckon if there’s not enough clearance, you can just replicate it with a larger diameter end-cap.
Also really liking your solution to the shredlights!
Thinking out of the box!

2 Likes

they are really sturdy too, it takes quite some force to bend them towards the wheel and no noticable pressure cracks.
brand is “polyplast”, but not sure if that really matters…

the final shape will depend on how they behave catching stones once i am able to test them

if all fails ill have to bite the bullet and try make them height adjustable also somehow :thinking:

2 Likes

sorry for the late update, but anyways after some testing in all possible conditions (gravel, wet street with leaves, etc…) these fenders work out nicely

nothing gets stuck, and i arrive dry at work where otherwise i would have been soaked

the only thing is, at lower speeds the rear wheels still throw water on me - so my next task is to design another set of fenders for the rear to eliminate this aswell

on a sidenote, these fenders also prevent a ton of water getting sprayed at my enclosure, which is another huge plus

10 Likes

How many miles have you tested these for roughly? I’ve been trying to get 3d printed mudguards to work for a while now and they all fail after 20-60 miles, might have to give these a go!

1 Like

hmm my guesstimate would be around 100 -150km so 60 - 90 ish miles,

they show no sign of wear, they also dont move at all during riding, like in vibrating or flapping

i built them with the idea in mind to reinforce them with epoxy / aluminium, but so far it really seems that wont ever be necessary

5 Likes

Sorry I’m not totally getting what you started with is this kydex or something else?

ÂżCurious what kind of failures you ran into (imagine just cracked along layer lines but curious nonetheless)?

They all would end up vibrating enough to hit the wheel at some point and then it’s pretty much game over for the part. Usually happened over tactile pavement, occasionally had failures from pot holes.

1 Like

hey, i updated the first post with picture / link of what i started with

2 Likes

Thanks, it looks like polypropylene is difficult to print with https://www.simplify3d.com/support/materials-guide/polypropylene/

I imagine some stiff nylon could work or maybe PETG if thick enough but nice to have some options for people who don’t have or want to mess with 3D printing too thx for the details.

1 Like

Made myself one of these to test, working well after one short ride!

1 Like

so cool, im really sure they will serve you better than those previous printed ones!

diddnt think someone would give that a try so quickly,
made my day :heart:

@MauveMaverick feel fre to show off the whole board with fenders mounted :slight_smile:

1 Like

This is genius. I just love it when people items against their intended purpose.

Simple and doesn’t require a 3d printer. Prettt sure it can be done with common tools too, e.g. saw and a drill.

2 Likes

its when your tools and funds are limited you come up with creative solutions :sweat_smile:

3 Likes

I used a Dremel with a plastic cutting wheel and a drill, I am sure it wouldn’t be too much more difficult with hand tools though.

1 Like