If anyone feels left out and wants in on my dual set, it is going to be delivered (in Ireland) next week.
Due to personal reasons I’m going to resell, $320 + shipping or Euro equivalent
If anyone feels left out and wants in on my dual set, it is going to be delivered (in Ireland) next week.
Due to personal reasons I’m going to resell, $320 + shipping or Euro equivalent
I just got mine, but since I’m not doing board stuff for the time being, I’m willing to send to anyone in the states. $335 + shipping!
6 posts were merged into an existing topic: Welcome to Derail Jail
For those of y’all getting ready to build these drives, I highly recommend bracing the two top facing flat sides of the mount against two top facing flat sides of the truck, and green loctiting the flat contacting surfaces. I also recommend red loctiting the mounting grub screws. Also I recommend you get stronger hardware than the standard hardware. Seal the left over box mounting holes with silicone and grease all parts of the thrust bearings and internal gears regularly with white lithium grease. Fill the enclosure up if you can (I didn’t only cause testing).
Just got mine today as well !
What motor?
Was thinking about slapping some 5095s on there, but it was like more than twice the price for an extra bearing and 15mm 
Nice! I thought they wear a 63xx size. But keep us posted on how it goes with the gears. I got mine but I wont be hooking them up anytime soon since I am in no hurry to get my next bbuild done.
Can anyone link the instructions? I was about to start assembling my set when I realized that I have no idea how this works.
Thanks
Unfortunately there’s never been instructions. Good luck fam. Please document for those of us who haven’t built yet.
It’s fairly self explanatory with a couple gotchas to watch out for which i’ve written above. Good luck
So #yolo.
I got this boys and girls and small furry creatures from Alpha Centauri.
Part 1 of ?
The #yolo guide to setting up your gear drive.
Note that I have a set, so if you have a single, divide the parts count by 2. In addition, I’m not using standard calibers because I like being special. I’m using @Boardnamics 220mm precision trucks, which match the caliber profile. They use shoulder bolts instead of axles, so some photos may not match an install on normal calibers.
Step 1: Identify and sort your small parts
1: long inserts for flywheels
2: longer m4 bolts to hold the housing to the caliber adapter
3: long thin grub screws for motor gear
4: long thick grub screws for caliber adapter
5: lock washers (not sure where these go yet)
6: Tiny little bolts to seal up alignment holes in enclosure
7: motor gear key
8: washers (not sure where these go yet
9: motor mount bolts
10: short thick grub screw for caliber adapter
11: short inserts for bergmeister adapter
12: shorter m4 bolts to mount motor plate to housing
13: brass spacers (not sure where these go yet)
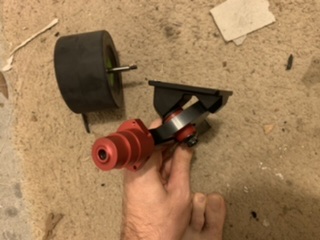
Step 2: Install the caliber adapter
Tools: Eyeballs, 3mm hex, loctite
Line up the adapter so that the bit that sticks out faces away from the kingpin nut.
Once the adapter is on the hanger, it’s time to secure it. Each adapter gets two short fat grub screws and two long fat grub screws. The short ones go in the shallower holes. At this point, you should align the adapter with the axle as best that you can. Use the grub screws to hold it in position. One by one, remove the grub screws, add the loctite color of your choice (mines blue because I screw up), and screw the grub screw back in. Once the grub screws have loctite, and the adapter is aligned with the axle, put some force on those grub screws to secure them in place. Now for the hard part: letting the loctite cure a full 24 hours before continuing. I get to cheat, my motors aren’t here yet so I can’t continue either way.
Step 3: not really continuing
Tools: micro flat head screwdriver
While we are dutifully waiting for the loctite to cure, let’s work on something else. Let’s work on the wheel gear. The wheel gear is in the white plastic pouch. It should have two different bearings on it, an internal bearing to rotate around, and that funky cylindrical thrust bearing thing. Carefully remove the wheel gear from the pouch without removing the bearings. Then locate the threaded inserts. For Bergmeisters, grab the #11 inserts. For flywheels, grab the #1 threaded inserts. Carefully thread the inserts into the wheel gear by hand. Once you have gotten them started, use the micro flat head screwdriver to secure the inserts all the way in. Be careful not to slip with the screwdriver, use your fingers to line up the head with the inserts. Now your wheel gear is ready for later.
To be continued when I get my motors.
Sorry everyone
Because there is a problem with the assembly video, I will finish it as soon as possible
I’ll bet its self explanatory after putting together countless of prototypes ;p
It was fairly self explanatory on even the first prototype ever with no instructions 
Esk8 cat disapproves of this builder flex moment.
There are helpless little Bill Gordons in here.
Your disapproval has been noted, forwarded to the relevant authorities, escalated, and denied. Thank you for using our disapproval services, we hope you have a great day!

