Good point xD
Even if you’re on the throttle most of the time, peak torque tends to be higher while braking.
1 Like
Did your motors come with very thin shims under the circle clip?
I noticed that on aps motors sometimes there is a bit of play. if you push the motor shaft in direction of the bell while the motor is mounted you can push the bell a bit back.
If there was play like this it probably always hammered on the circle clip till it gave up.
I would recommend to don’t use circle clips in future.
Just use shims, keyway and green loctite.
That’s how I mounted mine on my etoxx helicals.
1 Like
This makes sense, I was just about to ask how to tighten a circlip more. I had to deform it a bit to get it on and off while battle hardening the motors and noticed it was a bit loose.
Perhaps I’m misunderstanding, how would the motor stay together without the circlip?

2 Likes
Just the green loctite on your motor gear, but depending on the direction the helical would force the bell anyway in the direction of the mount.
Is the motor bearing spinning well? If for some reason the bearing locked and there was a axial force applied on the circlip, the rotation between the shaft and the bearing could have opened the circlip and made it pop
The shaft is spinning freely, I’ll need to disassemble it to see if it can still spin well. Too greasy to spin from the side at all.
Edit: it’s spinning well 
3 Likes
@Andy87 back to what you mentioned about the shim…
Coincidently, while epoxying the motors, I found one tiny motor shaft shim that fits the thicker section of shaft. The other motor was missing one. I flipped the room upside down and couldn’t find the other shim. I eventually got one from aps and asked a few people where that shim goes and got told it probably goes at the bottom of the bell like this.

Did your aps motors have 2 of these shims or just one? I may have put it on the wrong end of the stator bearing 
@rich I believe you had these aps 6384 motors too, do you recall?
2 Likes
I never had shims inside the bell.
Only between bearing and circle clip and often it was a different amount of shims as I guess there are some slight tolerances how the shaft is fixed in the back of the bell.
How does the shaft sit in the back of the bell by the way? Still flush or it moved a bit inside?
Moved a tiny bit as you suggested which makes me think I need that shim beneath the circlip instead.
3 Likes
I’m thinking another shim or 2
3 Likes
Definitely another. And a piece double mint to hold it in place
1 Like
Hey venom the shims at the bottom of the bell are there to space the bell from the mounting plate, so they don’t rub. And you want the space between the circlip and the mounting plate bearing to be filled with shims
1 Like
Had a motor that did that, shim got completely destroyed and it got worse from there. Has to be no play for sure.
I think filling with spacers between the outer bearing and pinion is a better option.
1 Like
This is my first post here so first of all great build bro 
According the shims, there were no addtional shims on the 6384V2 motors I have (on the shaft at the bottom of the bell). I had a pair of dickyho motors which had a shim there. It is not wrong but then the gap between can and motor plate gets bigger. I think this is only necessary if the can wouldn’t spin freely when you close the gap as usual by adding washers between motor bearing and circlip.
But as others mentioned don’t use the circlip when using helicals. You have to add first 10mm and then 8mm washers between motor bearing and gear until the gap is closed. In your case I would use clamps to hold stator and rotor together for zero play during measuring and gluing. The step down axle is a bit tricky, the last 10mm washer has to stick out a bit on the 8mm part otherwise you have a gap there.
You already discovered the sole disadvantage of helicals 
The motor gear has to be glued very well and not just a bit. Furthermore the gap between motor bearing and gear has to be 100% closed by adding washers. During gluing you hold (clamp) the gear against the can to be sure to keep it tight during curing. Personally I hold the motor and push the gear with both thumbs for the first 5 minutes to keep it 100% straight on the shaft. With a clamp it could get a bit askew if the force is not centered.

What do you mean with green Loctite, which one do you use?
From my experience 638 didn’t work well because it’s quite thick and normally the gap between shaft and gear is tiny. 648 is thinner and holds much better.

Personally I don’t use keys (and grub screws), just Loctite 648. Because during gluing it helps to rotate the gear when sliding on the shaft to distribute the Loctite. When removing the gear with a blow torch it also helps when you are able to rotate the gear on the shaft.
With helicals I recommend to regularly check if there is any play on the motors. Hold a wheel with one hand and with the other try to push and pull the can. If there is play then your gear or the shaft moved. I do this before almost every ride. With Loctite 638 often the gear moved a bit after 1-2 rides but still held strong. The play leads to rattling noises especially off-road.
5 Likes
Thanks for all the helpful advice everyone!
I still don’t see how not using a circlip would hold the motor together unless you mean just the loctited pinion and washers/shims would be holding the whole thing together. If that loctite failed, the motor would separate immediately vs maybe the circlip holding it together and just having the pinion shifting right?
But if the pinion never moves it wouldn’t be an issue I see.
The loctite I used was the 680 actually. It is very thin and meant for cylindrical mates. I’m sure that motor can gap I was riding with strained it quite a bit when heavy throttling.
2 Likes
If you’re feeling extra picky you can pin the axle. You can get cylinder head grub screws, drill a matching pocket in the axle (surface only because case hardened axles), and green loctite that in place…now it’s secure in all directions unless you shear that screw
1 Like
I bought some apv motors from a kid that couldn’t get the helical gear off and no circlip… I like them there motors. And the bearings and cans will hold it all together.  Freethenipple
Just to be overly clear, you mean on top of or below the circlip in this photo?
I think I understand this but don’t want to mess anything up. Can you summon your paint skills and diagram what you mean in this photo?

The clamping makes total sense to me 
5 Likes
I’m talking about the edge from 10mm to 8mm. The last 10mm washer should sit a tad higher than the edge to have no gap between 10mm and 8mm washer. Amazed about my painting skills? 
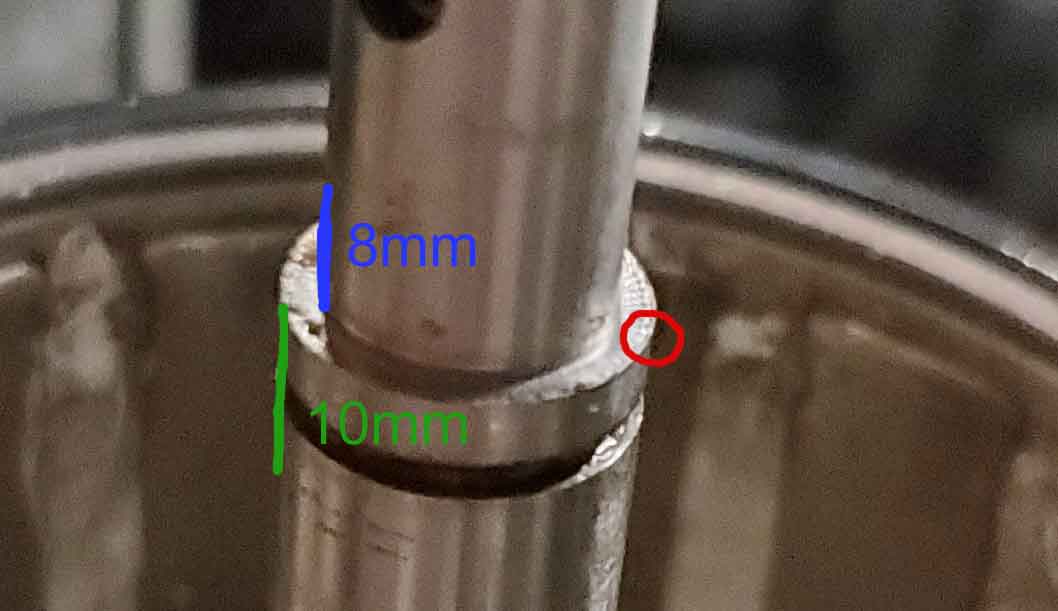
3 Likes
That is the exact picture I had in my mind and needed to see. Thank you so much.
5 Likes