Oh yeah of course I was going to add rolling ball to all the corners of the box, after prototyping. I’ve only ever used rolling ball though so I wouldnt be able to make that mount so I’ll look up the other types of fillets
I mean some sharp corners are okay as long as you know what you’re doing
nah its ugly. I was never planning on the sharp corner for the actual one
No of course. I didn’t mean that as a rule. But in the very harsh environment of esk8, rounded edges are your friend.
Right, I mean again, it depends where it is lol
I like aggressive looks
Wait would you use just a variable rolling ball fillet or make two arcs or curves in sketches on two adjacent faces then loft it together with one of the arcs being a guide rail?
Do you have pictures? Like a perpendicular one to see the clearance
Apologies for the watermark I turned that off recently thanks to someone on this forum. It’s about 5cm of clearance at the lowest point, havent scraped the enclosure after ~400km but at the same time I don’t take it flying off curbs.
Nice. I’ll definitely have 5cm probably closer to 10cm. With 9 inch tires I think it will align with the middle of the wheel meaning about 4inches below or 100mm.
You’re overthinking it.
Step 1: Make a box, with tabs
Step 2: Add a double length radius to your worst stress concentration (inside corner).
10mm long tabs get 20mm radius fillets
Step 3: Radius the rest of the corners
Step 4: Add fastener countersunk hole
You could radius all the sharp corners to reduce stress concentrations further, this is just a start. Also, all these numbers are random. Again, if this is new to you, I highly suggest you spend a month playing with fusion, designing, before you jump into printing enclosures. You will miss lots of things and waste lots of filament.
I echo the other sentiments expressed here - if you’re not already well versed in designing structural components to take serious repeated stresses, an esk8 enclosure holding a bomb going 30 mph is not the place to start. As tempting as 3D printing is… hammer… nail. etc. Fiberglassing is a better skill to pick up for this if you want to DIY.
I was definitely overthinking it. That’s why i wanted you to share the file. Thank you so much.
Another solution is to just print the walls and have a cutout plate on top, shut tight like the trampa box.
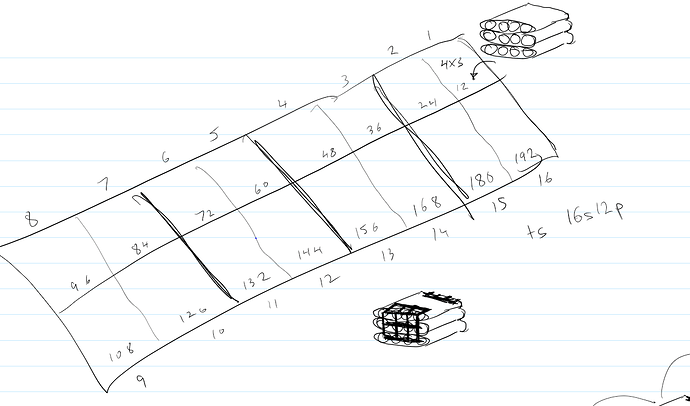
After a lot of thought, I have decided to go with a 16s12p instead of 12s16p. A big reason for switching is so that I can fit a better enclosure under the deck. This one will have 16 m4** (now m5) screws. If it wasnt for all of your feedback on my enclosure and plan, I wouldnt have made the switch. How do you feel about this enclosure? I could make 4 sections instead but I feel like this would be better for flexibility? There will be some form of cutout between them for the balance + main wires
Interesting change. Seems like it would be a lot stronger, however if you are going only two screws maybe M5 would be better. I have 10 M4 screws holding up my 12s7p 18650 battery and they still tend to want to work themselves loose even with such a small load.
Simply put wow, I picked up the parts to build another SEB led controller, I will do a build guide on the weekend I will also donate the finished unit for your build.
What! No you don’t have to do that! Omg 
Its no bother…
I think this is the nicest thing someone outside of my family has done for me in years. God bless you. Man I love this community  I just shared this for a laugh at my luck and so others in Canada dont have pay for shipping. I was going to say this week has gone from bad to worse. First mbs trucks are delayed, then yesterday my FS antispark came and it’s 13s max but now that I’m switching my build to 16s its useless now (I might just try it though) and now this with the cells. But now I don’t have anything to complain about. Thank you so much.


