Yes, but I’d use a separate supply.
2 Likes
I figure Ill ask again my own research says no but I want to make sure, will resin eat through hot glue? Im using this stuff: https://www.lowes.com/pd/Bondo-32-fl-oz-Brown-Fiberglass-Resin-Repair/3371926
From @SimosMCmuffin:

4 Likes
Using an rf-nano as my receiver it’s basically just an Arduino nano and Nordic rf chip and required components baked into a single board. So far no issues running it off the 5V from the regular receiver port but wouldn’t try adding lights or anything more substantial to the 5V rail better off using a buck converter or at least separate linear voltage regulator for anything else.
No it won’t dissolve it or anything but if you’re trying to use the hot glue as a waterproof seal, I’d recommend silicone instead.
2 Likes
Its gonna be for plugging the truck holes when I glass my deck. Not for any permanent usage.
@b264 I know you have a fondness for JB-Weld, but I thought I’d share something we find indispensable for field repairing almost anything…
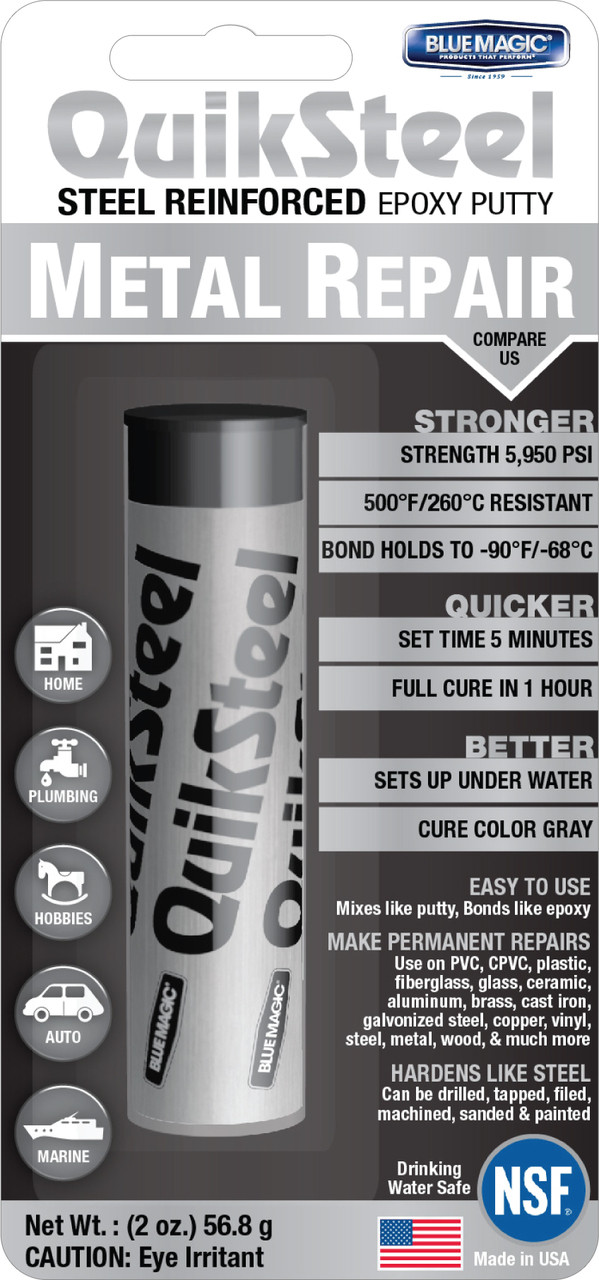
It’s moldable, sets fast, like ball-bearing hard quickly…
KEY BENEFITS
- Withstands Up To 500°F/260°C Temperature
- Can Be Drilled, Tapped, Filed, Machined, Sanded, & Painted
- Bonds To All Metals, Fiberglass, Plastics, Glass Wood,
- Ceramics, Brick — Almost Anything Except Rubber
- Sets In 5 Minutes
- Steel Hard In 15 Minutes
- Full Cure In 1 Hour
Anything you can do to metal or wood – you can do to QUIKSTEEL . SEALS LEAKS UNDER WATER OR IN FLUIDS: QUIKSTEEL cures underwater and in all atmospheric conditions. … IMPERVIOUS TO CHEMICALS: QUIKSTEEL is impervious to most chemicals including battery acids.
we’ve sealed crankcases and radiators in the field with this stuff, and if the hole is too large we as add an appropriately sized Mexican peso or a rock… sticks to almost anything, and hard as fuck… It’s difficult to fuck up, comes in a tube… slice off a chunk of the two part epoxy and squish and mix it together, and either form it or slam it on… BINGO finished (contains metal particles)
I just thought I’d share.
6 Likes
why not do it permanently and correctly?
1 Like
Because I want the holes where they are and the hot glue will keep the resin from getting in and making it hard to drill out accurately.
Plug the holes with wooden dowels? Atleast thats what I do at work when we laminate over holes we need to keep
2 Likes
Depends on your current draw. If your current draw is less than or equal to the BMS current rating, then you can use it as is. If it’s greater, you have to bypass.
1 Like
I’m not married to any brand, if something else is better I will switch in a heartbeat ![]()
Mainly when I say “JB Weld” I actually mean “name-brand slow-setting hard machinable automotive epoxy containing metal, not household clear epoxy or skinning epoxy” but it’s shorter to type “JB Weld 8265-S” or just “JB Weld”
4 Likes
Bestech D596 charge issue
Hi there,
I am having some issues wiring up my Bestech D596 (brand new BMS)
everything works and is wired correctly, except the + / - of the charge connector.
I have connected the charger + to B10 and - to C-
However when i plug in the charger it does not charge.
If I bypass the BMS straight to the pack it charges normally.
Can anyone shed some light upon this issue?

Edit: added picture
I picked some of the quick steel putty and steel filled epoxy. Was going to use it between the motor mounts and truck to eliminate any gaps between the clamp and the truck
They’re all gonna get bitched up lol. But the blue is my fav
I wish they had a 175mm hanger option
1 Like
Hi guys, anyone know of a difference between the working of the COMM_SET_CHUCK_VALUES on norm vedder FW and unity FW? When I activate cruise on an unity the same as on a FOCBOX the motor does full brake instead of cruise.
highlighting this since i want this resolved quite fast ![]()
I don’t have a D596 but except for missing a fuse on the charge port it looks correct. Although I can’t find any wiring diagram for D596, are you sure B- and P- aren’t switched? I can see no labels for those. Do you have a higher resolution photo?
1 Like

It looks correct then. I don’t know why it’s not charging 
Get the multimeter and test the voltage on the two wires going to the charge port.
Have you eliminated the port itself as part of the issue?
obligatory warning: never stick multimeter probes inside a charge port, and never use an unfused charge port
2 Likes