This is a brand new build so I haven’t really drained it much. All of my tests are pretty skewed as I’m pretty much just gassing it and stopping. Even though I estimate about 65 miles of range and even more with peddling.
1 Like
Found this great article, which perfectly describes what I plan to do (same as this guys V3):
1 Like
And it seems like you were talking about what this guy ended up with:
2 Likes
Yeah, exactly that
The problem is that I have less than 6 mm between the caliper and the spokes
2 Likes
And I can’t do it because it’s a full suspension bike ^^
2 Likes
Here’s something similar I’m doing on my full suspension bike. Gave up the disk break for some regen breaks.

7 Likes
You can, but it’s more challenging, you have to route the chain in a constant length path
@Mr.Electronicist I was interested in that, not sure if I’m willing to give up the brake, it negates one of the reasons I’m going to ebike instead of ESK8
Medo you have any videos of this beast riding? And what can you say performance wise? Can it climb anything you throw at it?
Nice! You also have the pulley/chain reduction combo!
I do not want to sacrifice my hydraulic brakes though. They matter for safety too much.
1 Like
With that much gearing down, does the tire skid or belt slip at max regen?
dual mode brakes is already a step up from eskate in terms of safety, so sacrificing the weaker rear brake for regen is a trade off I can see myself making
The problem I see is that lots of places I ride only the front brake is not enough, even more in the dirt
1 Like
@Pedrodemio I got lucky with my motor placement, so the chain stays pretty tight even when the rear suspension is compressed. I’m just going to put an idler on the bottom and top to keep the chain tight when braking.
@aletheuo That picture was taken last week, this bike still has a ways to go until it’s fully tested. I also just fully disassembled my 80100 motor for a rewind. But I expect decent torque, hopefully wheelie able. I’m sure I’ll be limited by the 120 amp vesc 6.
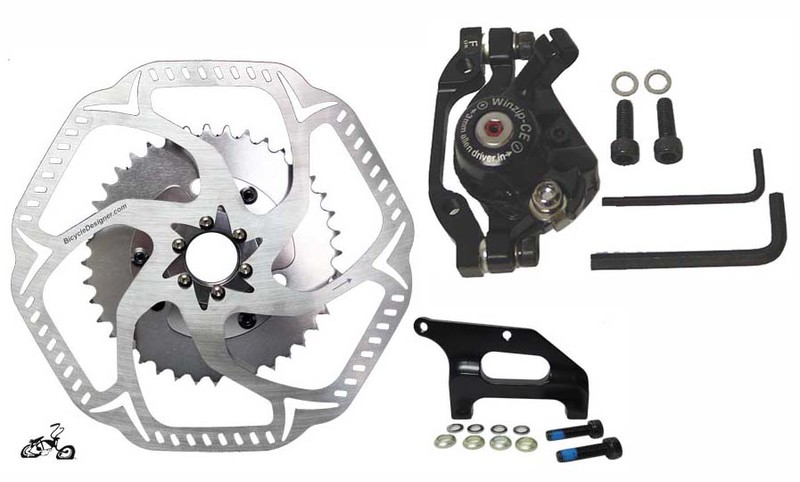
Worst case if regen isn’t enough for the Mtn Bike trails im after, then I’ll make an adaptor to have the disk brake next to the rear sprocket like this : https://www.bicycledesigner.com/images/zMotorized-Rear-Disc-Brake-Kit-with-caliper.jpg
2 Likes
This is exactly my initial idea, I’ve even bought a 26 teeth sprocket, but to maximize torque I would have to go 3 stage gearing or use a really big pulley on the first stage
Or fit bigger rotors to have more than 26 teeth on the wheel
If it’s sprocket diameter you’re concerned about, Instead of the standard #40, you could opt for a smaller pitch like a #25 or something that’d get you your ratio without interfering with the caliper boss. I think a go cart’s #219 could work?
1 Like
That’s a good idea, just have to check in the smaller chain can take the load
While the bike is rideable and performs great, the VESC is held by zipties with a few layers of duct tape, the best method of waterproofing according to @b264  , and the battery is kept in place by a few turns of masking tape. I don’t dare parking the bike anywhere as it is, nor go far since this time of the year the rain comes suddenly
So I designed this case for the FSESC 4.20 mini, an Arduino and and a HM-10. The battery will go in a under the seat bag. All this is just so I have something to ride while the MTB is not ready
The case itself goes between the tire and the seat tube, painted in matte black should be pretty discrete


5 Likes
So I made an spreadsheet to calculate the performance, and more important, size the components and make sure they can take the load
The initial plan of doing 3 stage is not looking good, it would mean going 25 mm wide on the belts for the second stage, so the drive train would start to get bulky and complex
It’s in portuguese since I didn’t think to share here first, if anyone want to play I can translate it
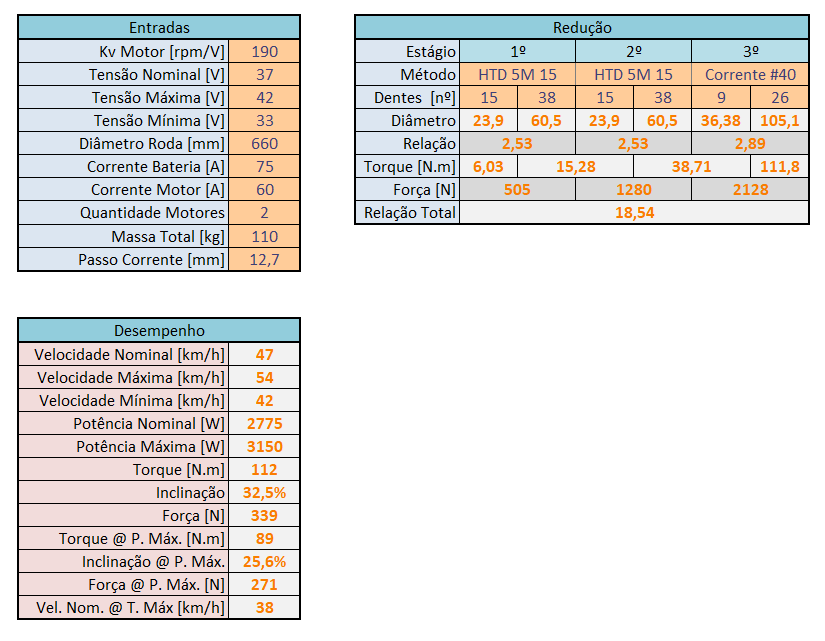
For two stage it looks better, a standard #40 bike chain can take the load with no problem. I would have a pretty big chain ring on the rear wheel, but no problem. First I need to measure on my bike the minimum teeth number that clears the rear caliper to determine the first stage gearing

3 Likes
New case to make the bike rideable, now single push button to change between various assist levels, all running on a AtTiny85, the code should be really simple, but proved to be a big headache even with the help with a friend that coding is a small part from his job  , I think we may have figured out what’s happening and hopefully I will have time to try in the weekend, but I will have to start from scratch since the way I programed it is flawed and doesn’t provide a good riding experience


8 Likes
I didn’t ask about your two buttons before, but you’re using more of the ports than I had expected. I was thinking you had them hooked up via ADC control as a binary on and brake. But, since you have a board connected to the receiver line, are you using a conversion board (the AtTiny?) to translate to pwm?
It looks like you’re also using the ADC connection on the COMM port which I was assuming were hooked up to your resistor ladder
Planning to program the AtTiny to read consecutive button pushes and translate them to a percentage of full throttle?
And the two wires coming out of the sensor port are for temperature?
(It would probably be cleaner if I just asked: “what are all the boards and plugs connected to the vesc?”)
Regardless, the setup is looking good!
2 Likes
Yeah, the first setup was using ADC, but holding the button all the time is not good, your fingers hurts a lot after a long ride
Now the button is hooked to the AtTiny and it to the VESC on the ppm input, I could use UART, but don’t know if the library will work
For now I have three levels that corresponds to the number of button presses, and if the motor is running one press kills it, or at least is what it should do
And yes, I added a temperature sensor and a Bluetooth module, I want to see how far can I push it current wise, because on steep hills this setup is almost useless
2 Likes
Still fighting with the push button, if anyone has background in electronics and can offer some insight I will be eternally grateful
If a short wire to the switch is used it works wonderfully, if the switch is mounted on the handlebars with a long wire all goes to hell
You can start the motor, but I would guess the noise due to the current feeding the VESC in a matter of seconds make a false press happens and the motor is disarmed or increase the power level
Any insight is appreciated, what I did so far is use a external pull up resistor of lower value, this made the short cable work reliable, but no hope for the long one
One suggestion I saw is to use an optocoupler and use the push button to drive it near the AtTiny to supress any noise