FoxTrot One | eBay 35" MTB deck | 330mm TKP | 8" pneumo | Unity | 12s4p 30Q | dual MayTech 6355

This build is the extension of the Pandora but too much has changed to be the same thread; I present the most overkill for a short range, level ground, low speed campus board…FoxTrot One! I have no justifiable reason to make this, but fuck it…I want a mountain board!

For the most part this is just for the rougher roads on the campus, I’m planning on getting a job near by too so every day is a mix of bricks and gravel coated roads day in and day out for the next 5 years. Supposedly something a little more plush will make a difference, the vibrations have literally eaten away threads on some of my parts.

This is all still in the works, I don’t think it will be operational until the end of summer


Parts List - about $1000 total
Basic Parts

  • [$240] Battery: 12s4p 30Q | 8A charger | HCX-D223V1 | ABS sled
  • [$210] Controller: FocBox Unity | mini remote
  • [$175] Drive Train: 330mm TKP | 200mm pneumatics | crossbar mounts | 12:72
  • [$180] Motors: dual sealed MayTech 6355 170kv
  • [$55] Deck: 35" 10 ply MTB | MOB griptape
  • [$40] Enclosure: sheet steel | 3/8" neoprene

Additional Parts

  • [$100] Hardware: wires | connectors | inserts | bolts | conformal coating | silicone 2+ | fish paper | heat shrink | kapton tape | etc.
  • [$50] Lights: 300+ lumen headlights | 144 pixel addressable under glow
  • [$15] Crash bar: 3/8" steel | para cord

Theoretical/Expected Specs

  • Range: 11 miles off-road to 28 miles cruising on asphalt
  • Speed: 18 to 25 MPH on roads depending on voltage
  • Weight: 27 lbs maybe?

So far I’ve purchased most of the parts but half of it comes international through eBay so it’ll be a while before I get everything and a much longer time before it’s all ready, estimate for functionality is end of summer.

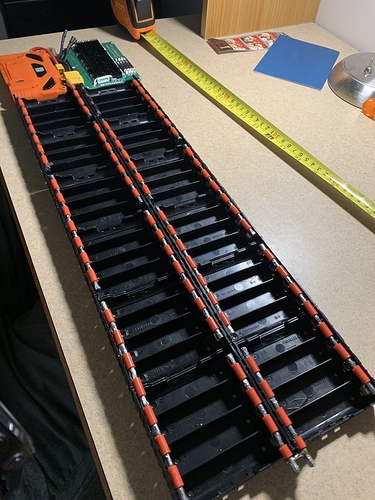
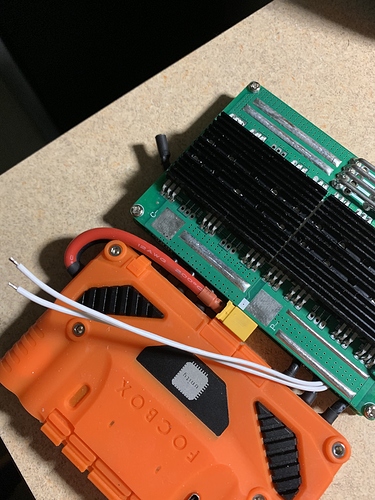
I’ve done about half the battery work so far, I made the sled from ABS cell holders with steel contacts and 10 awg silicone current carriers, I know the contacts are good up to 10A when they use the tiny pins so this should support 20A with the larger mass of conductive material. The balance wires are also finished with 22 awg silicone and run neatly to the D223. I need to do all the wires for the D223 which involves coating the Unity and D223 with acrylic conformal coating, replacing the Unity phase wires with 14 awg silicone and MT60 connectors then running them through the layers of the D223 (it saves me space) with a fish paper liner, and connecting the D223 power in and out leads.

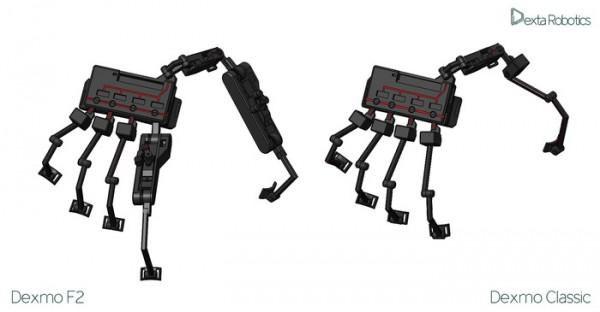
I got the Unity a while ago and proceeded to immediately break it, the USB-C port got ripped out so I’m relying on a stolen Moto G4 to program it over BlueTooth. It’s nice to know I have no reason to open the enclosure but it also sucks that I’m relying on a less stable connection. I may mount the phone to a bracket at the front and wire the charger cable to the 5V line of the board so I get constant feedback. For now I’ve got a mini remote but I think I’m gonna mod it to be wrist mounted and use hand positions to activate, open hand for brake so it stops when I fall and closed hand to go faster. It will be an exo-skeleton glove with a spring assist to hold at neutral and a mechanical dead man switch.
The drive train will be made from DickyHo’s new TKP off-road kit but I’m replacing the stock 6" wheels with 8" wheels and the motor pulley with a 12T, and most likely a new set of bushings and pivot cups from Riptide. Because of the way the 8" wheel is made, I need to remove about 8mm of material off each end of the hanger to get enough axle to hold the bearings, I’m praying to skatan that the axle doesn’t break because of it but it should be fine.

For now I think the body of the board will be the cheap mountain board deck with the steel enclosure but I will try to replace it with fiberglass when I have the time. I’ve got enough material to make the enclosure in a way that the components sit in the tray of the enclosure and the lid seals everything, so I don’t need to mount it to be water resistant. In theory I can use anything from a few loose bolts to a couple pieces of duct tape to mount the enclosure to any deck and it will always be sealed. I will also line the entire inside with 3/8" neoprene foam rubber (I ordered thinner but what the hell) and the wires will sit in channels carved in the foam. I’m going to try sealing all the corners with a MIG welder so it will be pretty strong and mostly water tight, but I’ll add neutral cure silicone to all the edges to be sure. I’m thinking of laser cutting a low poly fox into the grip tape and using foot stops. I think I will be okay without bindings since MOB grip tape has some serious gripping power.

Just for shits and giggles I’m adding a ton of lights, the current plan is a pair of high power LED bike lights for the front and 2 lines of addressable LEDs down the sides. For now the headlights are controlled with the stock buttons on the back but I am looking into getting a pair of LED street lamps on the front, don’t ask why but they should be able to output 6000 lumens if I have enough power for them. The addressable will run off a cheap remote control driver with the parts gutted and the buttons on the outside of the enclosure but I’ve got plans to get an Arduino tiny and a custom UART interface remote so the lights will run off that and be used as feedback.

Rather than lugging this around, I’m gonna try dragging it as much as possible. I think I can get the motors up high enough that I can use the front trucks to pull it. To serve as a handle for dragging, a shield for crashes, and a bracket for the head lights I’m gonna forge out a steel bull bar that bolts to the front hangar from 3/8" steel, it won’t be pretty but it should do the trick. I don’t know exactly how I will get it to mount but probably a pair of U-bolts since the hangars that go through the bar. Worst case is I use the bolts that hold the base plate instead, I’d loose the turning of the lights and close shielding but it would still work.

I’ll also try to get some wheel guards onto this but I’m not sure how, most likely I’ll make them from a single layer of fiberglass when I make the second enclosure, but they could also end up as just 3D prints


The electronics from this will be interchangeable with my other parts, which is another $300 parts for a 40" drop deck and 90mm ABEC ReFlys or 100mm MBS AT wheels on 195mm Paris II trucks with the corresponding mounts. The enclosure and motors will be removable since the enclosure is a sealed container and both decks will have the same mounting pattern so I can swap it over with about 30 minutes of work.


I’d like to know your thoughts on the build so far, any input would be greatly appreciated!
7 Likes

I made the file for the laser cut, one geometric fox! I think I’ll paint the deck before the tape so there is a pop of color

4 Likes

Due to the fact I actually cannot ride TKP trucks, I’ve purchased a 12T aluminum pulley which drops my speed to 22mph nominal give or take a few mph depending on the voltage. I got super lucky and the 430mm belts will work for both the 12T and 15T pulley even though the slot is only 5mm. If I really want the speed I can swap back to the 15T steel pulley and get another 5mph back.
In theory I can go up a 35 degree slope or 70% grade before the motors stall at absolute max discharge, which I think is reasonable for an eMTB

Edit: supposedly 80A is not enough to be worth it as an eMTB…but to be fair it came from a street cruiser. It’s being reclassified as an eATB?

80 amps will be plenty of power as long as you aren’t too big and riding super aggressively. It will be fine for your bricks and gravel coated roads.

1 Like

Update day!!! We’re on the road boys!

Shout-out to dickyho for basically supplying all these parts! A couple days ago I got a box from him with lots of brand new goodies in it, and today it’s finally out on the streets!

The plan was to use a 35" blank MTB deck but it’s still got hella wheel bite, as in the wheel pulleys are almost touching the deck, so I’m using my old drop 40" deck, no bite without mods

As expected all the kit parts go together perfectly, the mounts and trucks feel super secure, and damn does it look good with the silver/blue/black coloring. I added some paracord to the mount brace so I can drag the board around by the tail, I need to redo it but for now it feels good

Being the greedy dumbass I am I went with 8" instead of the tried and tried 6" that the kit is made with, and I regret nothing! The massive wheels are HELLA nice, it goes over destroyed sidewalks like it’s nothing…I’ve gone over the same path with my electric longboard and 90mm wheels, it literally cannot go over some of those cracks because the wheels get stuck, but now I just roll over everything!

The problem was that nothing fit off the bat, the threaded rod support for the motor mounts touched the wheel pulley so it had to be removed, and the axles on the TKP trucks are shorter than the bearing stack on the wheels (the stack on the pulley wheels is thinner for some reason) so I stuck the hangars in a lathe and took the body of the hanger down just enough to thread the nylocks on backwards, now everything fits

It felt like sacrilege to cut up a new MayTech but I needed them to match my Unity so they have new 3.5mm bullets, I’m gonna use an MT60 as an adapter for the enclosure eventually and it matches that perfectly

The battery is VERY temporary, is the 10s2p of fake 30Q cells I made a while ago using cell holders…it’s still holding up but it’s got hella voltage sag. Its currently wrapped in seran wrap and duct taped to the deck with the charge port hanging out the bottom, there’s no antispark or loop key but I have an XT90s coming off the BMS and an adapter from XT90 to XT60 going to the Unity

In it’s current state of 10s 170kv 12:72 8" it’s topped at 18.8 MPH according to GPS going down a slight hill on full battery, it’s geared for hella torque rn and I love it! It’s just slow enough I can’t get bad wobbles and I feel safe enough to not need a helmet (on flat ground at normal voltage it can’t even get to 17 MPH)

I’ve never used TKP trucks except on a nickel board (didn’t like it then) but these trucks are fantastic! Even with a 36" wheel base they can make a U-turn in my neighborhood (roads are just wide enough to drive with a parked car on either side), so I’m expecting it to be super agile when I get the deck with angled mounts and shorter base to work

Because I’m so light (120 pounds) there isn’t enough normal force when I’m breaking to keep pressure on the wheels so it starts skipping out, I need antilock brakes so bad, but the skidding is also kinda cool

P.S. my cat LOVES the new wheels

5 Likes

Advice needed - TLDR: how do you cut a deck for wheel bite?

When I ordered the 8" TKP pneumo set and the 35" MTB deck I though that they would work together seeing as mountain boards use that style deck and large wheels all the time, but I can barely get the trucks on without the deck touching the wheel pulley and it only turns a fraction of what its supposed to at the front, how to you recommend going about cutting the deck?

I can’t imagine any way to mount the trucks differently that would fix this, so I guess I just keep mounting the trucks, marking the points of contact, and trimming them with a jig saw?

Not 100% sure if it works but try Gbomb bracket so you don’t have to cut the deck.

1 Like

I think they would work but I don’t wanna loose the ground clearance and the deck has a 30 degree angle on the ends so it would ‘slide’ the deck down the bracket

Just to test the 30 degree wedging, I tossed the parts on a 32" popsicle deck (actually 20 degrees of wedge)…all the wheels in a line is actually the same length as the deck. Because of the slightly different geometry, there is no wheel bite on this

Conclusion is that it sucks now, the turning radius is worse than the 40" drop deck…the reduced width and increased leverage disadvantage means the turning radius is larger than it used to be, but at least I can easily drag it around now

I redid the wrapping on the battery with a Ziploc and fuck ton of duct tape and flipped it over so gravity holds the cells to the holders and it matches the curvature of the deck.

I’ve heat shrink wrapped all the phase wire connections so they don’t come apart and are insulated, and then the sensor wires to protect the JST adapter. The receiver is now protected by the current shunt rather than hanging out the back of the ‘enclosure’… overall much better peace of mind

The band of duct tape on the top actually covers the power button, I just stuck the wires through the original bolt holes, so I can easily turn it off

The power meter actually faces forwards so I can read the damn thing, apparently it’s only pulls 6A once it’s in the 31V to 34V range and the Unity puts it into low power mode, or the equivalent of a 1cc bike engine

2 Likes

I did a bit of riding over the last couple days, over 20ish miles of riding I’m averaging 22 Wh/mi…is this reasonable with my setup (dual pneumatics at 40 PSI and geared for torque but light rider and light hills)?

  • Seems reasonable
  • You fucked something up

0 voters

1 Like

This project has been terminated. Almost all parts are being sold. Building will resume shortly on FOCsTrot Lite…smaller, faster, better, sexier

Help fund the new build :wink:

how was the xt60 to xt90 adapter, I also have a unity

1 Like

I just soldered the connectors end to end and wrapped it with electrical tape, it is a hassle free way to use an XT90 battery, and it only costs the 2 connectors and about 3 minutes of your time

1 Like