| Buddy’s Board | 12s4p p42a | MBS Warren Pro 97 | 2wd, OG focbox | Matrix II trucks

Right on. It feels so much better with a beefier ESC. It was frankly embarrassing how wimpy it felt earlier. there is still some room to tinker, but all the right stuff is there. ESC came from @Bobby.


Oh yeah, the polyphenylene sulfide filament sidequest I started, concentrated hydrochloric acid didn’t do shit to PLA. How did I end up here? Multiple sources state “ PPS is completely insoluble in any known solvent under 200°C.

That’s ridiculous. any solvent? nothing?

Acetone next. I’ll Timelapse the sinking benchy with good lighting. I’ll print a few spares for you in PPS incase you ever get weird with chems.

image

3 Likes

Thank you @Bobby
Miss both you guys. I’ve been working a ton the past 3 weeks. I already need a vacation :weary:.
Im gonna plan a trip south, wanna come ride with yall again.

2 Likes

Couple of major tips for getting killer results with electro-anodizing titanium:

  1. Wash part with soap and water first, removing any oil or contamination, then etch the material using a very toxic chemical (weak solution of hydroflouric acid). Most acids wont touch ti, but even a low percentage solution of hydroflouric acid will eat titanium for lunch. It’ll also eat humans for lunch if you get it on you, and it can be extremely damaging to us because it passes through skin very easily and causes major cell disruption, so use with extreme caution. You only need to etch titanium for 20-30 seconds, a minute max, longer times will quickly erode metal, in fact, I use this for resizing small diameter stock of titanium because it’s very fast and consistent, and much easier than machining it. The acid will leave a very fine matte finish, which really takes anodizing colors well and makes them pop! Especially the tricky high voltage colors like the greens, because there’s also very tiny sub-micron pitting caused by the acid it not only makes the colors brighter, but makes them more durable.

  2. Clean with distilled water after etching, I usually hang the parts from a bent titanium rod, dunk in the acid, which is contained in a tall, stable, plastic (PP stands up to weak solutions of HflcAcid, I’ve used the same container for many years without any signs of degradation stored out of UV or major temps) tupper with a tight fitting lid, along with two more filled with distilled water, and a another vessel with water and a neutralizing agent. These are all packed tight together in a work space where I can move from one, to the next directly. Rinse in distilled water dunking a few times, then you can move to the next or wash with soap/water in the sink, being careful not to handle it with bare hands even after it’s safe, because skin oils will contaminate the part and leave fingerprints/splotches.

At this point you can etch in any electrolyte solution, which a solution of sodium bicarbonate mixed with water, functions as both a neutralizing medium for the acid, and a elecytrolytic solution for etching, so basially go from acid to distilled water, to neutralizer/etching solution, and etch, 1-2-3.

  1. Finally, higher amps will give brighter colors, especially at the low voltages, however, you need a PSU that can reach 115VDC or so to get the full color spectrum, the bright green especially, depending on alloy runs somewhere between 90-110v, and various alloys will color differently at different voltages. Higher voltage will always “overwrite” lower voltages as well so for doing multi-color designs, start with your highest voltage color, use resists or sand material away after, then move to the next lower voltage, and it won’t touch the higher volt colors. All kinds of things work as a resist, markers, paints, spray coatings, wax, glues, etc, ideally use something you can chemically remove using acetone or some other low-residue solvent however, so you dont spend a ton of time cleaning between cycles.

Lastly, extended time etching at a particular voltage doesn’t help after the first few seconds the color you’ve got is as much as you’re gonna get, but the difference between amperage available at a given voltage can have a big effect on how rich or vivid the color is, and sometimes a fraction of a volt higher or lower can as well.

Anyway, these are the caveats to getting pro, bling AF results from electro-anodizing titanium fwiw. Anyone that wants to know where to acquire an inexpensive, off-the-shelf/locally available (in the US at least, I believe it’s very difficult to acquire in Europe however) solution of the etchant that works out of the bottle, hit me up via DM, but I’ll only provide this info to people that seem semi-responsible/mature and understand the risks. High concentration hydroflouric acid can be DEADLY just through skin exposure, although the concentrations we’re talking here are unlikely to be, they can still cause serious and significant burns and cell damage, which, shouldn’t be surprising from something that can dissolve titanium while you watch, even at 5% concentrations. So extreme caution, personal responsibility, and accepted risk shouldn’t be disregarded. Obviously use PPE, research which PPE is durable in this case, all gloves etc are not equal in regards to all chemicals, especially when dealing with plastics, but hydroflouric acid even damages glass, and you actually need to use polymer storage!! YMMV and YMFD (You May Fucking Die)! :face_with_peeking_eye:

4 Likes

You had me at hydrofluoric acid.


I’ve been down the ti electro anodizing rabbit hole too. I was watching a chemistry YouTube video and realized I have all the reagents and electronics and ti sample parts to give it a shot, same day I plated a penny in nickel and a quarter in copper.

It was all really sloppy prep wise. I don’t have di water on hand, didn’t etch either.

Appreciate the great detail you went into here. The repeating colors with progressive voltage increase is fascinating, but like makes basic physics and chemistry sense when you consider what’s actually happening.

It’s sounds like a general theme of your recommendations spills over into paint jobs and composite work. Everything is in the prep, consistency, and the right reagents/materials.

Torching anodizing some cheap ti fasteners from hobbyking was too easy.

Do you have a thread or topic with pics of some of the things your done?

6 Likes

Well, if I have an experts attention here, you have any shortcuts for distinguishing the various alloys of ti and also pure titanium? What about from non magnetic alloys of Stainless? I’d weigh them if I had a fastener of the same volume dimensions, but not always the case.

Is there like, “one secret trick your local machinist and metallurgist doesn’t want you to know? :joy:

1 Like

Well, the easy answer with the two common alloys of titanium you’re likely to run into is: if you can bend it and it stays bent, it’s CP/Grade 1-2, if it springs back, it’s likely Grade 5/6al-4v or a similar alloy. Likely only because these two varieties seem to be many orders of magnitude more commonly used and available than any others. However if you’re picking through drops from a specialist aero/space manufacturing or fab facility, all bets are off!

6al-4v seems by far to be the most common alloy floating around though, since it has mechanical properties that are generally favorable for mechanical uses, however people seem to often misunderstand them, and which alloy to use for what. CP is infinitely easier to machine mechanically for instance, can be cold formed (forged) easily, and still has excellent strength to weight, and corrosion resistance characteristics. 6al-4v on the other hand is hell to machine conventionally, can’t be cold formed in any meaningfully productive way (it does forge well under heat, however has some caveats compared to steel in temps and the way it reacts, plus easily creates a very dangerous and difficult to extinguish metal fire), etc but it has most of the desirable properties of spring tempered carbon steel with the added titanium benefits, if you can utilize it.

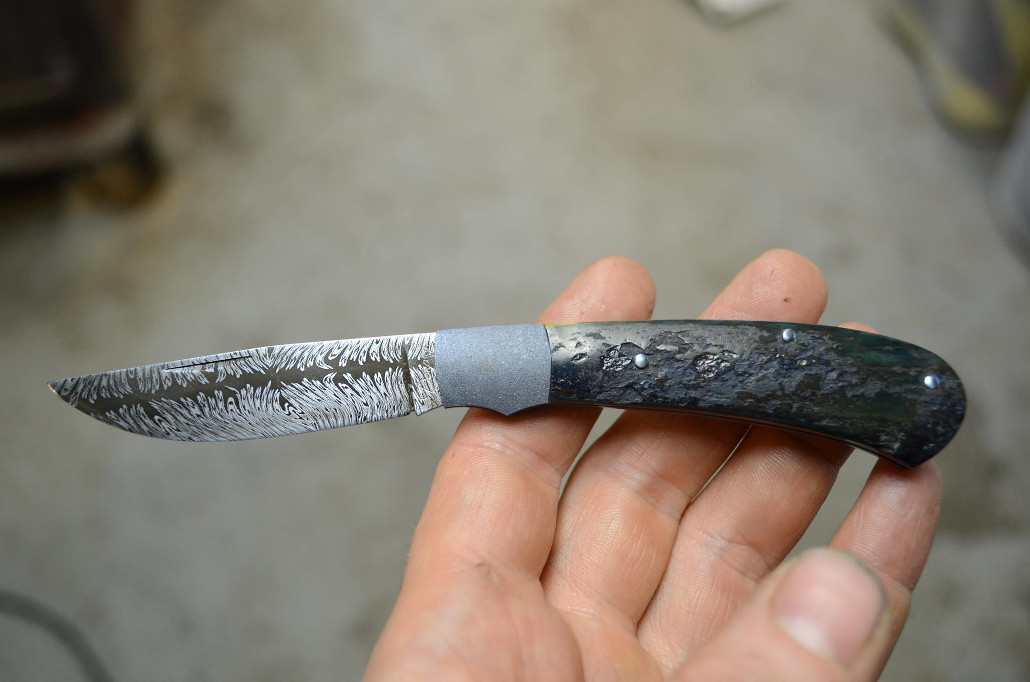
I use a lot of both varieties on my knives, but CP doesn’t get the love it deserves IMO. I think I was one of the first custom maker to utilize it for fittings, especially for domed pins, which are hand peened on the finished piece.

Below is an early example, just blue fittings, and before I was using acid to etch the ti, so nothing super bling, but you can see the pins I mentioned, apart from the steel (one of my unique damascus patterns) for the blade and the backspring, the remaining metal is all CP/Grade-2 titanium. The bolsters are finely textured, which helps to reflect light making them sparkle and helping the finish hold up, much like the acid does, but coarser however. I did this by blasting it with a pretty coarse media very carefully with everything else masked off. It works great for giving it some extra durability but also, add a ton of grip!


4 Likes

oh the above applies to a degree to stainless as well, but is more nuanced, I can usually figure out “approximately” which alloy within a series, by trying to form it with a hammer. For fasteners/machine screws, clamp it in a vise or something and beat on it a bit, gently, see how easily it forms, and how quickly it starts to crack. 308 feels like you’re beating on a rock lol, doesn’t want to move and feels like it’s fighting you, but it’s not the same as hitting hard steel, and shouldn’t do any damage to the hammer face like hard carbon or tool steel would, 416 will move a lot easier, but it will start to splinter at the edges quickly, because of the alloying constituents which cause it to be “free machining”. 410 or 420 on the other hand (both my favorite stainless steels to use for non-hardened parts) are both forming grades and thus move very nicely, and hold up to long forming operations without crumbling or splitting. I joke that I could take a piece of 410 3/32" rod and dome 1/2" pin heads if I wanted to, that’s an exaggeration, but 1/4" is totally viable, it’ll let you peen it all day long with nary any backchat. When peening domed pin/rivet heads, you use hundreds or thousands of small light blows with a relatively pointed peen, so holding up to tons of repeated stress without work hardening is key and that’s all in the alloy and the quality of the steel.

Same as with 6al4v titanium, 416 stainless is IMO way too commonly used as the “go-to” for anything that has even trivial machining ops, because it’s “easy to machine”, but the trade offs in mechanical properties IMO make it a poor choice for anything that doesn’t involve complex multi-axis work, or deep pocketing ops. Here’s a good summary actually from Atlantic Metals about 416 that I think really drives home the compromises:

“Considered the stainless steel king of machinability, 416 stainless steel achieves such outstanding levels because of the extra sulfur found in its properties. The additional sulfur forms manganese sulfide inclusions which have the effect of not only lowering the corrosion resistance, but also 416’s formability and weldability, compared to its non-free machining counterpart 410 stainless steel.”

It also needs to be heat treated (though it’s only marginally hardenable) after all other ops, to bring the corrosion resistance up to any appreciable level, which I think most people forget or never learned to begin with.

It’s taken me 15 years to get most of the pocket knife makers to stop using 416 for everything, just “because it’s easier to machine” when they aren’t really machining anything appreciably. 410 is a much better choice, and honestly it is not difficult to machine.

Haha, looks like you got me ranting, I bet people would hate to be sitting near us in a restaurant!

5 Likes

Here’s some photos of some components (hopefully wont get in trouble for firearms stuff here) on my LW AR that I anodized using the above methods, and showcasing some of the deep high voltage greens that are so hard to nail down. Bear in mind, I did this almost 10 years ago, and this rifle has been carried daily in the woods since, and held up quite excellently. The flash hider was intentionally done two-tone btw as well to give it a worn look, the anodizing has held up fine, look at the wear on the barrel/handguard retaining nut in comparison.


5 Likes

This is the most interesting thread derail I’ve ever stumbled on.

I need to post all the 3d printing files I made and used for @skunks board above. He prints stuff and if he ever needs fixes or wants to mod stuff, the files for him and others will be here.

@Venom121212 @longhairedboy what’s best practices for sharing files here? Links to sites like printables.com? Raw upload here? Google drive or Dropbox?

I have another project with titanium parts from sendcutsend that I am now free to finish, guilt free. I will ping you when that starts up again.

Although, that build thread is a fits and starts, unorganized chaotic mess. Maybe a posting with a title like “titianium and finishes for the nonmachinist esk8 diyer “. :+1::+1:

3 Likes

Thingiverse is on its way out. I think most people are using thangs.com these days.

3 Likes

What? On its way out? Why.

It was a great read when i couldn’t sleep at 2am last night though

1 Like

Handling of user data, schotty search function, random down periods, broke a ton of uploads a while back. Lots of people still using it though.

3 Likes

Looks like the other one you posted is behind a pay wall. Is there not a good free option?

Nah it’s free

2 Likes

There was a rain. Highway in and out of high desert was closed.


If fedex is open today, boxes go. I’ll pm contents.
@Skunk send address.

4 Likes

Got it. Sending dicks and all.

3 Likes

Yaaaaas

1 Like

I has it…

4 Likes

Damn this thing is fun


Need to do some reading on what all i can do with this


tn

Had to dig out the armor. Its been a while since I’ve ridden anything.


Need to buy a camera again. Miss recording the ride.
Thanks again Mike. Highlight of my year.

8 Likes