Senor PeePee joins the 3-link club!!
have fun!
Senor PeePee joins the 3-link club!!
have fun!
How come the 3-link trucks only have two links?
I believe the third link is the axle 
because brian you are missing…you.are.the
To reduce flex, you’d be better off using carbon fibre or at least a heavier glass like a woven roving rather than cloth.
Also, I really think you should have sanded the deck bare. For structual application, applying composites to the paint/print is probably not the best practice.
I did sand down to where the paint was well scuffed, down to the wood in some areas as evenly as possible with low grit, same thing on both sides.
I’d use a heavier cloth, I’m just working with what I can source locally though, this is such a side project… literally just to hold me over during shipping of my mountainboard deck that honestly if it doesn’t work well at all I’m still happy cause at least I have a fiberglassed shortboard now. Sanding bare would have been way too much work, a power sander is one thing I do have… along with a CNC router or drill press. 
me… from my background (off-road racing) i see the links as the heim-link connecting the axle to the board as one link… the other 2 visible control links are the other 2.
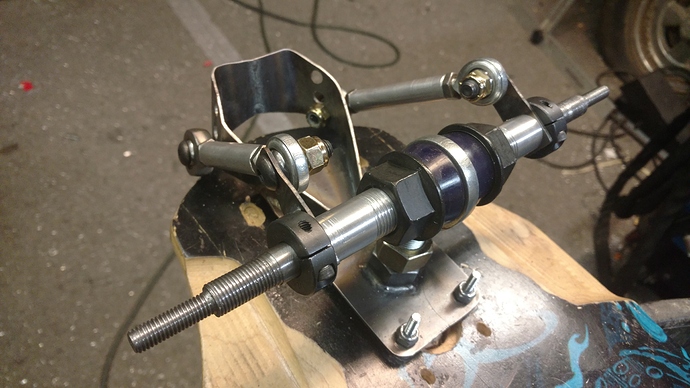
@MoeStooge the inventor of the 3-link trucks (and name) actually commented that his design was a modified 4-link and had a drag link to center the axle, (my words from here on out)… I can see that… the bushing set-up is actually a modified drag-link that controls axle centering
The pocket protector wearing guys and I had an interesting discussion that the board was the 4th link… but that’d mean the drag link was an additional link and therefore would be a 5-link
Moe calls 'em 3-links and so do I
Paint stripper works well on most deck prints, and then sand.
how difficult were those 2 pins in the hanger to get out? I assume it was pretty simple…
Let’s just say it’s a good thing I work in a machine shop. The whack’em method didn’t work, needed to use a press. The pins were mostly a press fit and there was also red loctite. They were removed with a hammer and punch. Now if I can just get my replacement axel…
I wish we would just move to 10/12 mm shaft entirely. Esk8 is not reliable with 8mm shaft.
I would rise up the ABS current if you run so high motor current settings. Depending on your motors you could get cut outs while hard accelerating.
I’m not a battery builder but wouldn’t bit be wise to put fish paperon the enclosure where the wires will rub? (In-between each compartment)
ABS Current, is that Absolute Maximum Current on the screen? If that’s it, the setting is capped at 160A, otherwise I would’ve had it on 200A already.
Yes it is the one on the screen. To get higher currents set there you would need to flash the hw no limit fw which is included in every fw release.
As far as I know the current sense does just work well till 160A. Probably the reason why it’s limited to this value in the standard fw.
I had ABS overcurrent cut outs with my 6384 APS motors when accelerating with 100A motor max and abs current to 150A. After I set the abs current to 200A the faults didn’t appear anymore.
Same (200A) for me on Unity, I’ve only had it once on Stormcore, running 20S LiFePO4 with the 160A.
So do i understand this correctly? Enertion pers Jason 150,000$?
I hope he is will be paid last with what remains if that’s the case.
Makes me not want to go outside.