That’s a cool idea!
Ran across this while browsing aliexpress: https://www.aliexpress.us/item/3256804382422804.html
Solid one-piece tungsten carbide nozzle. Every other hardened nozzle I’ve seen be it, ruby, diamond or carbide, has just had the tip be the hardened material and the rest of the nozzle body be something softer like steel or brass.
Steel and ruby nozzles have a noticeably worse melting performance because steel and ruby are worse thermal conductors than brass.
Carbide has a higher thermal conductivity than brass, and far higher than steel. This should mean you get just as good or even slightly better melting performance, but with a nozzle that will never wear out.
I suspect that this would make it the “holy grail” of nozzles, if only they weren’t quite so expensive.
There you go:
Much stronger than anything printed and you support the community. Sorry for the offtopic.
Thanks but I already knew about these. I don’t have room for one since I have an ESC at the front there and a Davega on top of it.
Ah gotchu. Maybe print a side-by-side solution then?
I would lean more toward getting a metal xmount from xboards and then putting some inserts into your printed part.
I did this on my raceboard and it hasn’t broken off yet. Used two 4mm heat set inserts into petg with the pattern of the xmount in it
See here:
Just upgraded my Ender 3 Pro with bigger fans and an SKR Mini v3, and so far it seems like everything’s plugged in correctly. However, my parts cooling fan doesn’t seem to want to turn on unless it’s on 100% or close to it. Anything less and it makes a ticking sound. My theory is the fan isn’t getting enough power, but I can’t plug in my old fan to confirm. I’ve never run anything other than stock before - is there something that needs to be set in firmware when changing fans to modify the scaling? Running the latest Marlin firmware if that matters.
Also would appreciate any checklists for things to do when replacing the board. I’m thinking PID tune and esteps, but there’s probably other things I’m forgetting.
Any chance you got a 24v fan and a 12v out on the mini? My order history shows me buying 24v ones and I also use the v3 minis but just a thought.
From what I read the Pro uses all 24V, so I got 24V fans. At 100% it feels like full blast, which with a single 5015 feels like wayyy too much power tbh. I had tried lower voltages on the bench during testing and it needs a fair bit to spin.
Yeah agreed. It’s wild at full speed. I can’t imagine running 2 of them like some people do.
Can you measure voltage at the fan to see what it’s getting as you adjust the percentage control?
I swear I had one that did this years ago but I can’t remember what I did to fix it.
You don’t by chance have the fan turned off or crazy low in the slicer do you?
Voltages look fine, 24V at 100 and 12.8V at 50%, which is close enough.
I haven’t even gotten to the slicer yet, just manual control so far to test things out.
laughs in dual 5015
I generally don’t run them at full blast unless it’s PLA and I’m in a hurry though
Even still I struggle to understand why that much cooling is needed. Most of the time I run 50% on the stock 4010 blower, and I only moved to 5015 for noise, although that turned out to be a lie, as all of my upgraded fans somehow are louder than the stock ones despite being bigger and not dying.
Well, I’ve got an Ender 6, which is a core-XY machine, and I’m printing fairly fast. Currently running with perimeters at 120mm/s and infill at 160, and once I get set up with klipper with input shaping, I intend to go even faster.
With speeds like that, small parts really benefit from a lot of cooling when the layer times are low, because so much heat builds up that things stop being solid even five or more layers below the current one.
So an update on the fan issue - after doing more research it appears that the fan has some sort of undervoltage lockout circuitry that’s causing issues with PWM. I was able to get control by turning on software PWM control in Marlin, which allowed it to start working at ~50% duty cycle, which I was able to rescale it so it’s 0%. It’s not perfect, there seems to be a noticeable bit of pulsing that I can’t get rid of, and there is a huge difference in power from 99% to 100%, but it’s controllable and that’s good enough for me at the moment.
Check out this abstract art print of Gizmoduck (the patron saint of EUC and character on Darkwing duck)
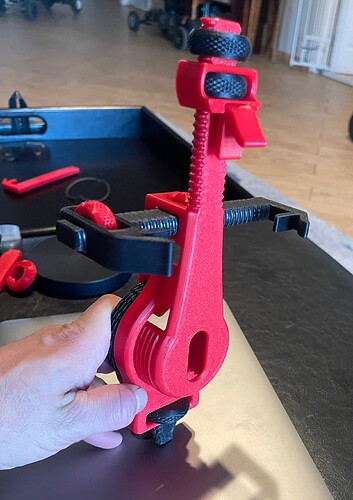
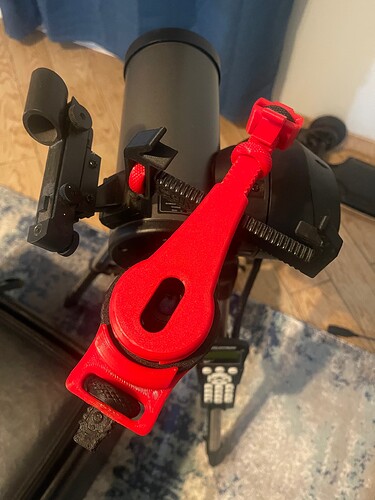
Psych! It’s a universal optic mount for large phones with multiple camera sensors. Free in x y z r, optic diameter, clamps phone above optic red stage in pic, allows for protruding sensor bezels from phone.
I think it’s cool. I’ll take some nonpotato photos of the sky later.
Neat, show sky pics pls.


