iLogger - Updates / Support / Dev [Serious]

Hey guys,

This thread is going to be dedicated to iLogger project updates, suggestions, and development logs. In case you are new, check out the announcement thread.

A brief introduction: iLogger is a 42.6 x 19.9 x 9mm module powered by ESP32 and capable of “always-on” logging to its built-in SD card. It is CAN + UART enabled, Wifi and BLE capable, compatible with most GPS modules, and has a companion app and a cloud API.

Security:

  • Logs are encrypted, locally, and during transfer.
  • Pairing is protected by a 6 digit pin.

Viewing Logs: There are two ways you can access your logs:

  • Stream via BLE locally - Limited by BLE data rate. :turtle:
  • Stream via WIFI (If your ride is online) - Almost instantaneous :rocket:

Ride functions: You can for each ride:

  • Add/modify message note
  • Get a unique URL
  • Delete/View

Updates:

  • Infinity Tool app: Updated through Apple and Google play Stores.
  • iLogger FW: Over The Air updates (OTA). Checks and performs firmware updates through Wifi automatically when initiated from the app.

SETUP:

Pinout:

Step 1: Using provided CAN wire connector (4 wires), connect CAN port 1 on iLogger to VESC CAN port. If using UART, connect the provided UART cable.

Warning1: Do not connect both CAN and UART cables at the same time!
Warning2: Double-check pinout before powering anything on

SD Card: Maximum supported SD size is 32GB. Format using FAT32.

VESC Setup: If using CAN, enable CAN Status Message Mode and set it to CAN_STATUS_1. Set CAN baud rate to CAN_BAUD_500K. Set CAN Status rate to 5Hz. If using UART, enable UART app and set baud rate to 115200

Step 2: After connecting and powering on your iLogger (Orange LED), download the app from iOS or Google play store, and refresh the BLE discovery page if you don’t see the module listed.

Google Play link: https://play.google.com/store/apps/details?id=com.wavrx.iTool
Apple store link: TestFlight - Apple

Step 3: Tap “connect” next to the module, this will attempt to pair your iLogger module and opens up it’s settings page. A pin dialog should popup automatically, enter your iLogger pin number (6 digits).

Once the correct pin has been entered, you should see the iLogger ver, Vesc ver, Wifi status and GPS status fields update automatically. If it doesn’t , it means that the pin was not correct and you have not paired with the iLogger yet, tap disconnect, go back to the discovery page, and connect again to enter the pin.

Once you have successfully paired, tap “SETUP WIFI” to enter your Access Point’s SSD and Password for WIFI provisioning. Internet access is used for automatic time synchronization, OTA (Over The Air) updates, and cloud backups.

Logging Settings:

  • Log on move (enabled by default): Enable to start logging only when the wheels have moved by the specified move distance. Else it will continuously log even when idle.
  • Move distance: If log on move is enabled, set move distance to the distance you want to travel before starting to log. (default 1 meter).
  • UTC Offset: Set your location UTC offset for accurate time.
  • idle time: If log on move is enabled, idle time is the time it takes for the iLogger to stop recording once the wheels are idle. (default 10 seconds).
  • Wheel size: Wheel size in mm.
  • Poles: Number of poles of the motor.
  • Ratio: Motor teeth: Wheel teeth.
  • Port: Select between CAN or UART COMM. (CAN by default). Requires a reboot!
  • Log frequency: Controls the log frequency, 5 Hz means 5 samples per second. It is recommended to keep it around 5 Hz for a balance between performance and accuracy.
  • CAN ID: iLogger uses CAN ID 8 by default. It is recommended to not change it.

Once done, tap “Apply”. If your Wifi credentials are correct and the iLogger has successfully connected to your access point, a green LED will turn ON.

LED Status:

  • Orange LED: Indicates power ON.
  • Green LED: Indicates WIFI is connected successfully. When iLogger is updating through OTA, green led will be blinking.
  • Blue LED: Indicates SD Card was detected, blinking blue light indicates it is currently recording a ride.

Step 4: Go to SD Card tab where you will find information about storage usage, and directory listing of files and folders.

Rides are organized in Log folders, each Log folder contains a set of timestamped Ride files. You can “Add note”, “View”, “Upload”, or delete each entry.

Step 5: Tap “View” to stream log data into the App over BLE. Tap “Upload” to upload your ride to the cloud.

Note: If ride is not uploaded to the cloud, it will stream over BLE every time you want to view it, which is slow, to avoid that, upload it once, a cloud icon will appear next to it and viewing it would be instantaneous from that point forward.

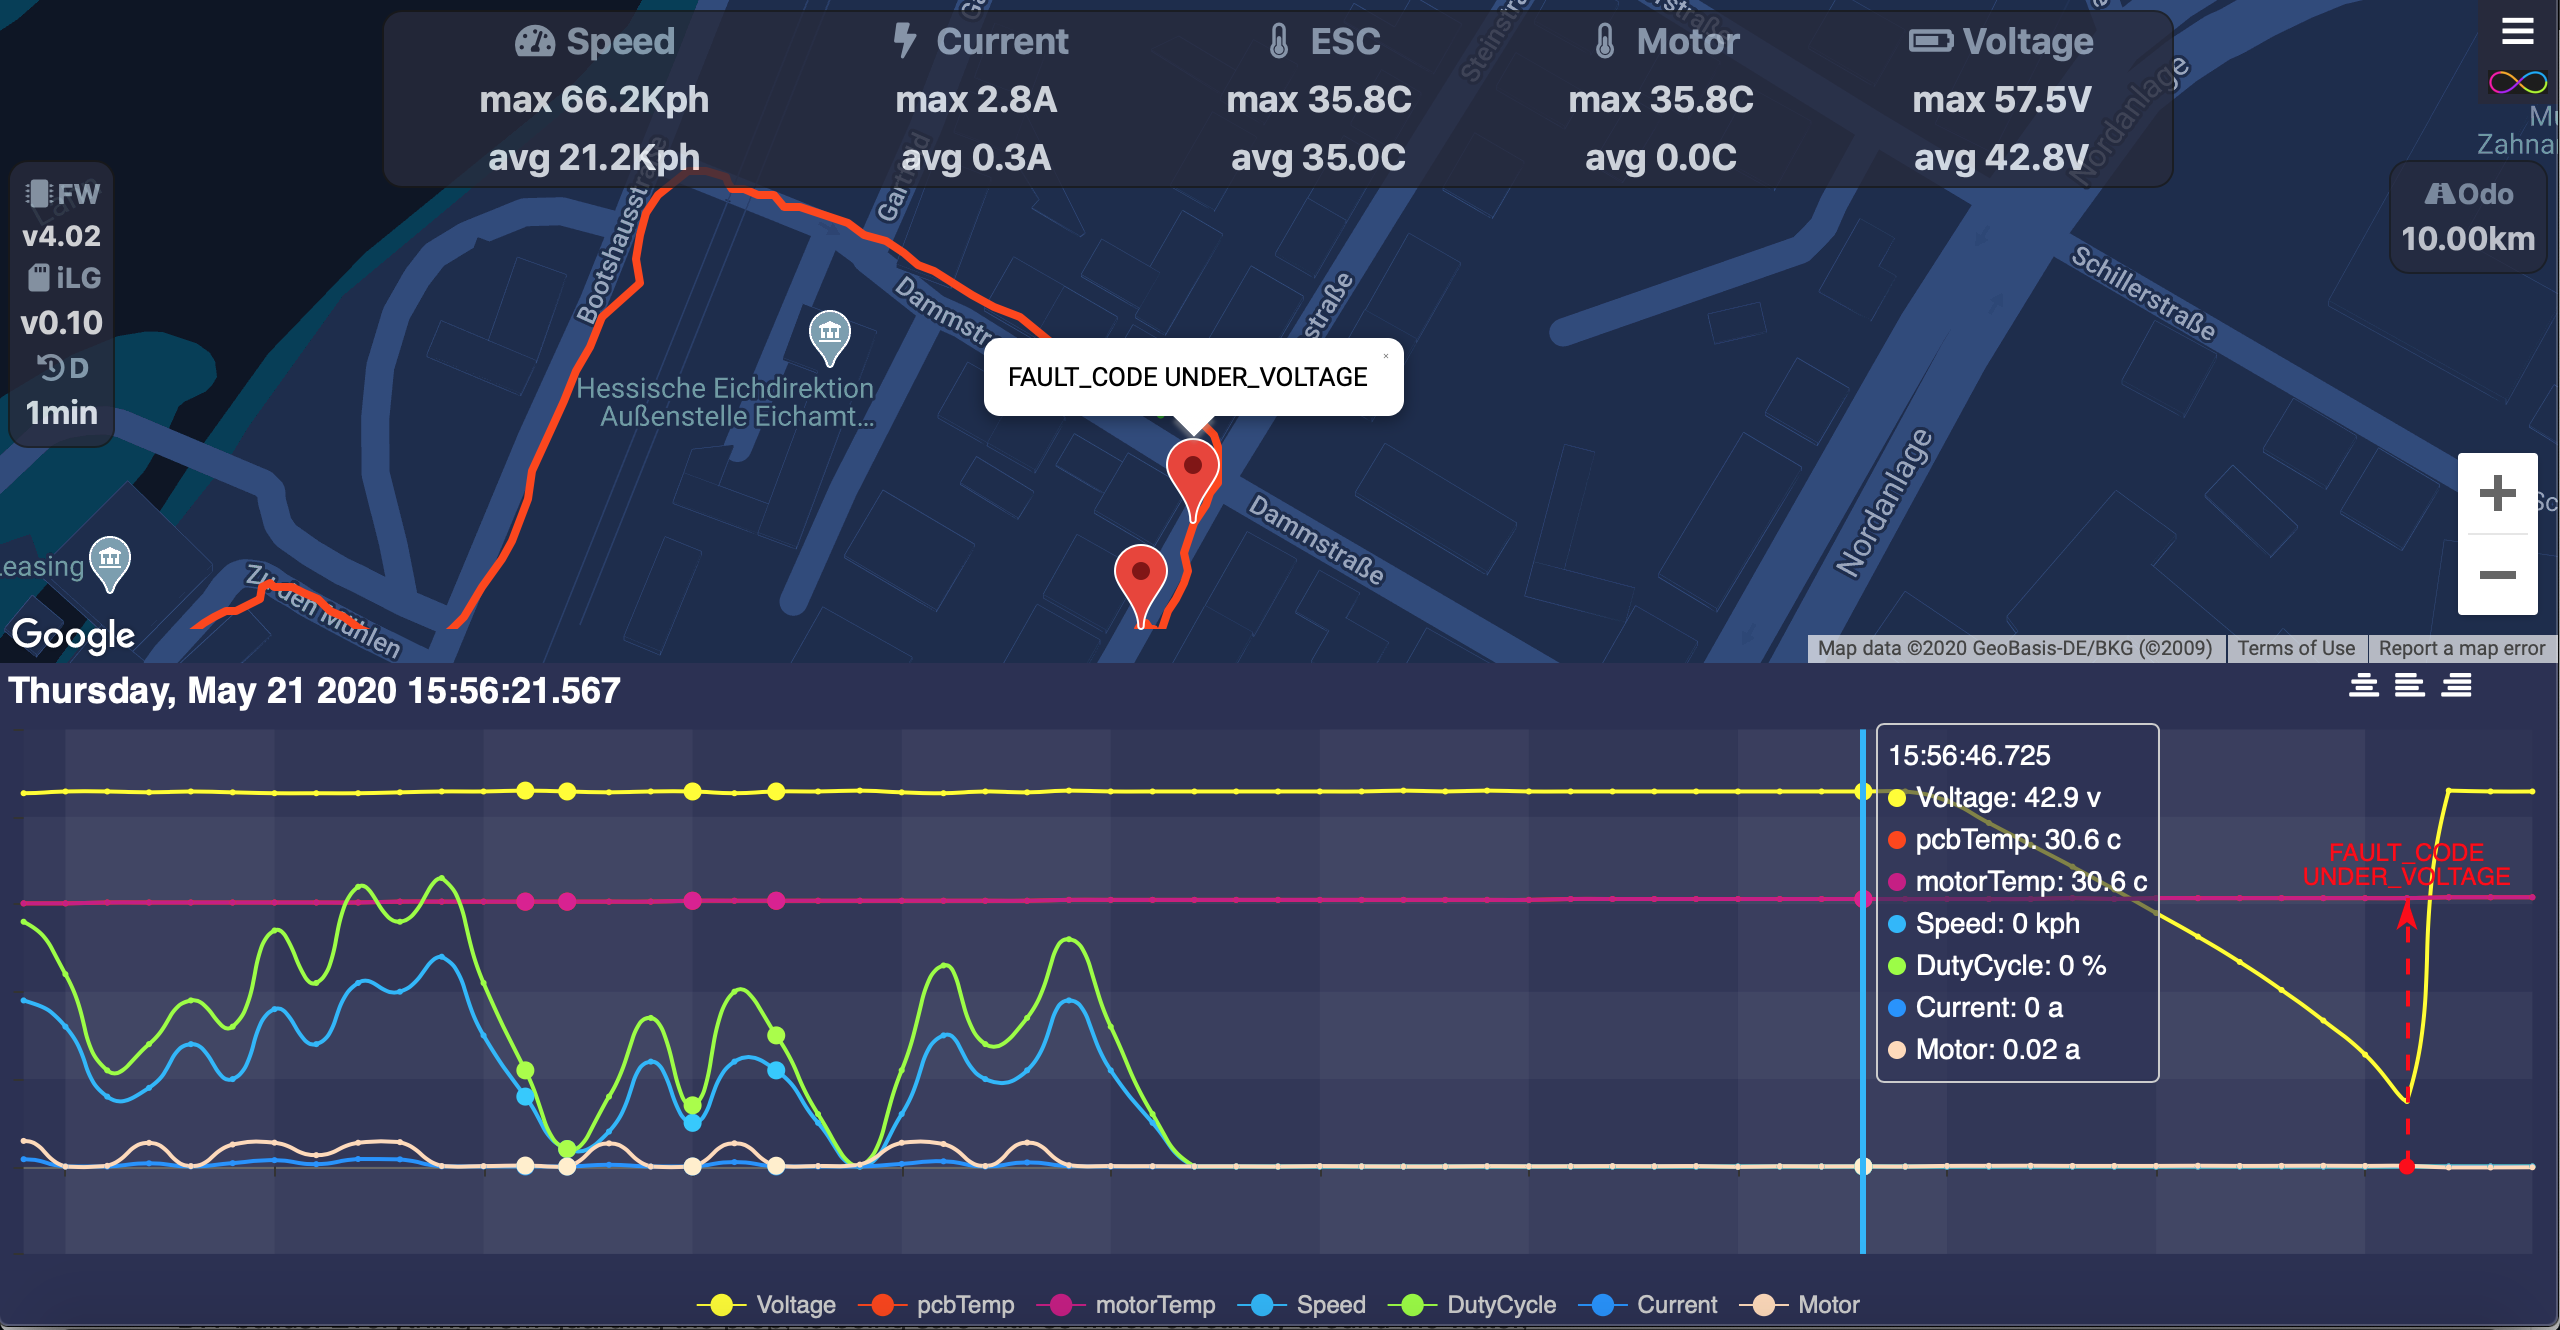
You can zoom in and out, pan, and display a detailed tooltip of each time slot. You can also hide/show each chart line by taping the legend.

Step 6: Since iLogger is Wifi enabled, you can seamlessly share your ride by tapping “Upload” button, this will upload your data to api.wavrx.com and returns a unique sharable URL.

13 Likes

Day one update:

  • Fixed timezone offset bug when retrieving time from GPS.

  • Added a cloud icon next to uploaded rides.

  • Added instantaneous log viewing once uploaded.

Google Play link: https://play.google.com/store/apps/details?id=com.wavrx.iTool
Apple store link: https://testflight.apple.com/join/2tQEgBWQ

Testing: Since my resources are limited, I cannot test every hardware/fw out there. So compatibility will be progressively added as I receive feedback.

When reporting compatibility issue please post your Vesc FW and HW.

Confirmed Vesc HW list: 4.12,

Confirmed Vesc FW list: 4.02,

7 Likes

Canbus vs. UART
Is there a reason to use one over the other?

1 Like

I’m personally going to use the CAN Port to free up UART Space.

3 Likes

As @Jc06505n already mentioned, CAN is better in many ways. It requires less wires, faster, can listen to other vescs and devices, is not limited by space, and is more robust.

4 Likes

Sup guys,

Infinity Tool app is now available for iOS devices on TestFlight: https://testflight.apple.com/join/2tQEgBWQ

iLogger v0.03 update is here, bringing many fixes and new features:

  • Fixed google map API not working correctly on Android
  • Fixed GPS map centering when no GPS log data was recorded
  • Fixed BLE service UUID not advertising correctly
  • Fixed settings sometimes not saved correctly preventing wifi credentials to connect.
  • Fixed a bug where motor temp wasn’t logged correctly
  • Added a UTC offset drop-down selection menu
  • Added the ability to rename your iLogger for better multi-module support.
  • Updating settings now auto restarts iLogger to make sure settings are applied successfully.
  • Added lifetime Odometer logging ( Any suggestions about what other lifetime values to add?)
  • Introducing real-time screen, shows you a list of connected iLoggers, and a real time data feed of several telemetry data.

How to update?:

Method 1: OTA

  • Connect to your iLogger using the Infinity Tool, make sure it is connected to a wifi access point (Green LED is ON), go to settings, “Check For Updates”.
  • If your iLogger is connected to the internet, you will see a message saying that a new version is available, and it is going to start the firmware update automatically.
  • Wait until it says update done successfully, this can take a few minutes, please do not interrupt.

Method 2: Failsafe

  • This is a failsafe method in case OTA fails or you are not able to get your iLogger successfully connected to the internet.
  • Download the latest update from http://api.wavrx.com/firmware/update.bin
  • Place the firmware update named “update.bin” in the root of your SD card, put the sd card back in while the iLogger is turned off. Before turning it on, press and hold the failsafe button. Turn on the module, then release the button.
  • iLogger will try to find the update.bin file in the root folder of the SD card, and it will perform the firmware update automatically (The blue LED will blink very fast when it is being flashed).
  • Give it a minute or two, then press the button once to go back to normal mode, this will restart the module automatically, and it will boot into the new firmware. You should be able to see it in the devices list now.


An update on Batch#2: I have 50 iLogger modules currently in production, I will update you once I receive them.

6 Likes

Alright. Got it connected to my phone finally. However the app seems to want to connect to my other Bluetooth devices haha.

Also it seems to not want to detect my gps module. I’ll triple check my wires and also a reboot. Will return with findings. Figured it out, it wasn’t powering it on, had to change cables around to connect to the right pins. No luck on detecting gps still. However it does turn on and blinks leds once but then that’s it.

iLogger FW: 0.03
Vesc: Unity
Vesc FW: 5.1

@Kalitapaws Thanks for the report, yes that shouldn’t be happening :smile: I found and fixed the bug.
Regarding GPS module, when you open the setup page of the iLogger, what it says under the GPS status?

Oh perfect!

And it has “No GPS detected.” :frowning:

Which GPS are you using?

https://www.amazon.com/Beitian-Glonass-Passive-Raspberry-Aircraft/dp/B0881HGGRQ/ref=sr_1_1?dchild=1&keywords=beitian+180+gps&qid=1598334579&sr=8-1

I assume the GPS LEDs are blinking right? Just to make sure that it is powered up.
Also how did you connect the pins? The GPSTX pin of the iLogger goes to the RX pin of the GPS, and GPSRX to TX. ( a reboot is required if you make changes, because the GPS module is only detected during boot time).

They only once and then nothing. I did change the pins according to the logger pin out, made sure that all 4 lined up to each other.

Looks like the white and green pins are reversed. Tx should go to Rx, and Rx to Tx.

lmfao i thought i had it correct. now the tx led blinks. However still no gps detection.

Ok, that’s a good sign, it means they are communicating. Have you rebooted the iLogger to check the status again?

turning on and off my esc is how i’ve been rebooting it yeah.

Gotcha, I’m adding that to my debug list to push in next fix update.

1 Like

Is it possible to use the iLogger as an UART-Port extender?

Like: the iLogger is connected to a VESC via CAN-bus and an UART device is connected to the iLogger (instead of directly to the VESC). The iLogger then forwards the UART messages over CAN to the VESC.

I guess it is technically possible as long as you specify a VESC-CAN ID for the UART connection, so that it gets forwarded to the correct VESC (since UART is Peer-Peer the messages don’t contain a receiver address, so for transmitting them over CAN you need to add it). Also you may need a “virtual” CAN-address for the UART Connection to receive stuff from the CAN-Bus afterwards, but this is should be also easily doable since the sender address is in the payload data for VESC-communication.

1 Like

@WavRX
Finally I received my two Loggers today. Unfortunately I can’t see the Logger in the app.

-tried to updated it via SD card to 0.03
–> blue light is flashing really fast for about 20 seconds. After that blue and red lights are steady. If I press the button again nothing happens. Already tried the update process 4 times
-connected it via CAN bus and UART
-MK4
-Android app from 24.08.
-I see the Ilogger in Vesc Tool App but can’t connect

@Giga got the same proplem on his android phone

1 Like